

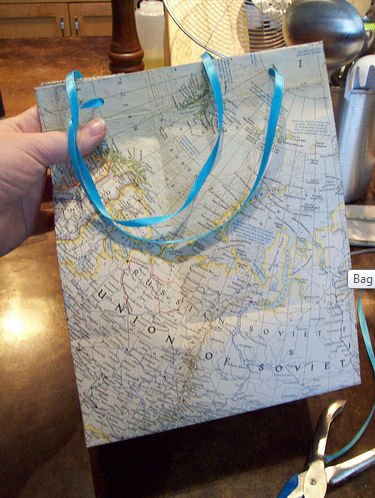


If boxes aren’t your bag, then make a bag! They’re not just for gifts, but wrapping a gift in a pretty bag made from a map is a great way to recycle something old into something new, and maybe even something blue! These would also make the PERFECT welcome bags for out-of-town guests if you use maps of your city.
Here’s how to turn a map into a gift bag.
Materials and Tools
- Map
- Pencil
- Scissors
- Gluestick, glue dots, double sided tape, or another adhesive
- Hole punch
- Cardboard (form an old cereal box or case of pop is perfect)
- Cording or ribbon (for handles)
Procedure
Step 1: Determine your dimensions. We’re going to make a bag that’s 10″ tall by 8″ wide by 5″ deep. You’ll want to scale your drawing in step 2 up or down according to your dimensions.

NOTE: Make sure that your bottom flap is 1″ bigger than half your depth or your bag bottom will have a hole in it. Sadfais.
Step 2: Measure and trace out your dimensions like so, using any already-in-place-folds if any are convenient. (You’ll actually want to trace on the back, but I wanted you to see how the map’s going to work for this.)

Step 3: Cut out your rectangle and make all the noted folds.

Step 4: Cut out two rectangles from your cardboard that will reinforce the ties of your bag. Cut out one piece of cardboard that will support the bottom of your bag (this should be width times depth or 8 x 5 in this case).

Step 5: Assemble! Slide cardboard supports for ties into place on the sides of the bag and glue in place. Glue the top support flap down all the way around the bag.

Step 6: Next, glue tab and flap together to form the bag sides.

Step 7: Now fold the bottom sides of the bag in and crease the front and back parts of the bag bottom into triangles. You’re going to form the bottom of the bag as if you were wrapping a box with gift wrap. Glue bottom flaps in place firmly and stand bag up.

Step 8: Add the cardboard you cut to support the bottom.

Step 9: Punch holes in the front and back of bag, nearer the sides than the middle, through all layers of paper and cardboard.

Step 10: Thread your cording through each hole and make a sturdy knot. TADA!

Applications:
- Make welcome bags for out-of-town guests out of a map of your destination.
- Fold a pile of smaller bags to hold flatware, napkins, and beverages at a picnic event.
- Hand kidlets-in-attendance a bag of goodies just for them, like crayons, scavenger hunt pages, etc.
Tips:
Obviously, this doesn’t have to be made out of a map. I just love me some maps. You can use newspaper (though I’d double up the layer of paper in that case), calendars, magazine pages, recycled wrapping paper, coloring book pages – whatever suits your fancy.
A glue stick or double sided tape works best for me. Regular school glue is a bit messy/warping for this, but if it’s all you’ve got, just make sure you give it time to dry in each stage of assembly so things don’t slip around.
Your Turn!
Will you make some gift bags like these? Tell us how you’ll make this DIY your own.





11 responses to “Bag in the USSR: How to turn an old map into a gift bag”
Cute!! My fiance is a pilot, and we have a TON of expired aviation maps hanging around. We usually just use them like wrapping paper, but this is a very cool alternative!
Oh, this would be PERFECT for the welcome bags for my destination wedding! Thank you for this brilliant idea and tutorial, I can’t wait to try it!!!
Wish I could pin this to my diy board so I can remember for later, why is pinning disabled?
The original photographer changed their sharing/privacy permissions on Flickr, but we have retained one photo for pinning purposes.
…please message me about this… I’m not even on Pinterest…?
Liz, check your flickr privacy settings.
You have to be kidding me. I just looked for paper bags tutorials this very morning and… tadaaa! Thank you for this post!
I’ve made these in all different sizes tons of times before. Really simple, and great job with the explanations! I’ve never thought to use the paperboard for the bottom/sides–I’ve always just used the map itself.
I have 500000000000000000 Alaskan topographic maps that were given to me a couple years ago, and use them routinely for everything. I swear, when I get hitched, our theme will be Alaskan maps. Or at least I’ll be finding ways to use up a ton of them for it!
When you do, send pics! Would love to see maps all over the place 😉
I’m apparently inept at the bottom folding – so I used a shoe box as a shape guide – and did just what the directions said – I wrapped a present:) Viola! I have bags! Love this idea and now I love my bags!
Awesome. I’m glad the wrapping a present worked for you!