

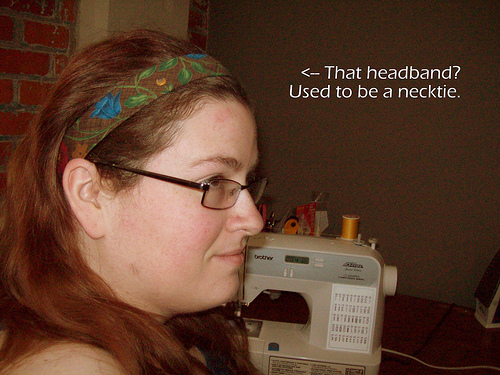


Whether you have long hair, short hair, or no hair, a headband is an accessory that’s easy to wear. For those of you with gender-blind wedding parties, this can be a cute little statement piece “tie”-ing the looks of your groomsladies to the looks of your bridesdudes, for example.
Here’s how to turn a necktie into a headband.
Materials and Tools

- Necktie
- Elastic
- Scissors
- Matching or coordinating thread
- Needle or sewing machine (I tend to machine sew, but this is easy enough to hand-stitch)
Step 1: Measure about 20-22inches of the skinny end of your necktie and cut.

Step 2: Cut pointy end off necktie.

Step 3: Cut two inches of elastic.

Step 4: Turn cut edges of necktie in.

On the formerly pointy end, this should be easy. On the other end, you may need to fold the fabric back and remove about an inch of the padding material to make turning in easier.

Step 5: Center elastic in the opening, placing half an inch in each side and pin in place.

Try it on. If it’s too tight, loosen the elastic and/or cut a larger piece and try again. If it’s too loose, tighten the elastic, and/or cut a bit more from the tie.
Step 6: Once it’s a good fit, stitch each edge of the necktie closed, catching the elastic. Use backstitching or a second row of stitches to ensure good hold on elastic.

TaDa!
Applications:
This is a simple way to tie a lot of looks together. It’s also easy to size down for kidlets, and don’t let the rest of the “tie” go to waste! There are lots of projects for recycling ties — even turning the remaining “fat half” of the tie into a clip-on version.
Tips:
If you want to hide the elastic for some reason, you can cut the whole thing another inch and a half or so longer and then slide the entire elastic inside, stretching it as you stitch down the center of it, to encase it in the fabric of the tie but still get the effects of the stretchiness.

Your Turn!
Will you tie one on your gorgeous head? Tell us how you’ll make this look your own in the comments below.





7 responses to “Make headbands out of groomsman neckties for your groomsgirls”
so i had a totally awesome idea about 2 weeks ago when my fiance is given a selection of expensive (and rather hideous) silk ties… i dont tell ANYONE, then it suddenly turns up on off beat bride…. FML
This can also be done by feeding the tie through the wider kind of plastic hairbands, if you, like I, feel like elastic makes your hair bunch. they can be closed up with a couple of stitches around the back.
that is FABULOUS!!!!!!!!!!!!!!!
What a cool idea! Any suggestions on how this could be adapted to make a garter? I have this amazing purple paisley tie I’m itching to do something with…I was going to dye Easter eggs with it, but I couldn’t bring myself to ruin it. I have a few others I will definitely be making into headbands!
If you take the elastic and feed it through the tie, it should make a rather simple garter. Measure the elastic beforehand by putting it around your thigh. safety pin it into a circle then make sure it doesn’t fall down (walk around and stuff). Use a safety pin to feed the elastic through the tube’o’tie. For the best effect, the length of tie should be at least twice as long as the elastic. Once you have the elastic sticking out from both ends of the tie, sew it to itself (by machine) and hand stitch the two ends of the tie together over top of it. 🙂 note: sometimes (a lot) ties are sewn “shut” or in pieces at sections. You have to make sure that you use a length of tie that is one continuous piece of fabric.
Thanks! Can’t wait to try this out 🙂
Hey, I love this idea, I used to make dog collars out of ties too, now am trying this, and also going to try bookmarks out of ties. there are so many uses of ties, and some are stunning.