

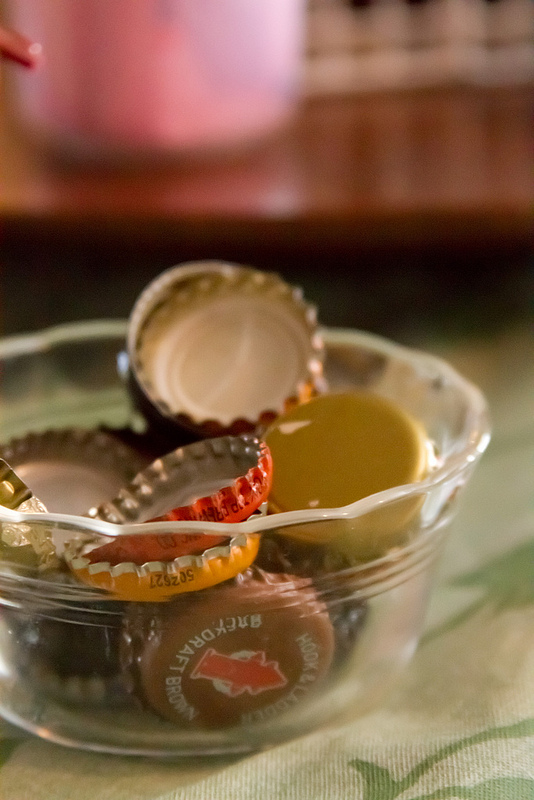

 Years ago my potential hubby and I started collecting bottle caps. We’d empty our pockets the morning after a party and see who had drank more… so it was a badge of honor thing that just kept going. When he proposed last summer it didn’t take me long to figure out a use for all these awesome bottle caps we’d collected.
I’d seen bottle cap magnets on craft sites before and was interested in playing with craft resin so I put the two together and voila: nifty home crafted wedding favors! Another great perk is so far we have only spent money on the resin and magnets to put in the bottle caps, as fortunately, I have access to my mom’s craft materials that have been piling up for years and years.
So… if you have a butt-load of bottle caps and are feeling crafty here is how I put together our bottle cap favors. It also helps to have some creative friends/bridesmaids/sisters to come and help out.
Step 1: Prep the bottle caps

 Make sure the bottle caps are clean of course! If you want to remove the rubber seal from inside, we found a lighter and a pair of pliers worked well. We also got bored of removing the seal after the first session.
Step 2: Magnetize and Decorate
 Our first few sessions of making favors we did not have magnets yet. This turned out to be a mistake, since we wanted to show the outside of the bottle caps and these will have to have magnets glued to the back of them. We ordered some neodymium magnets on Amazon that are only 1/4 inch across. Put one in each bottle cap and decorate away! Some of the bottle caps we painted our wedding colors (orange and green) and others we did in silver/gold/black/whatever-we-felt-like-doing.
 Next we decided what we wanted to go in the bottle caps. We formed some S’s (for my potential last name, bwaha!) using wire decorated with seed beads, and gathered up lots of random stuff like glitter, maple leaf shaped brads, and later we even got some little flowers that were blooming in the yard! Anything that fits in a bottle cap works great! Once you have your random (but of course self-representing) bits and bobs… bring on the resin!
Step 3: Resin
 Follow the directions on your resin carefully! If the resin is not mixed correctly it may not set up.
We found resin at a craft store, first in the floral area and then later in the jewelry making section. It was a lot of fun to add things in after we put the resin into the caps. We did some experimenting, such as swirling some wet paint in with a toothpick or layering glitter and resin. We set up some disposable pie tins for the bottle caps to sit safely in for drying.
Because the resin starts to set after a while, we would mix enough resin to do about twenty-thirty caps at a time and call it a day.

What would YOU stick in your bottle cap magnets? Tiny action figures, vintage photos? Your wedding logo?




8 responses to “How to make your own bad-ass magnetic bottle cap wedding favors”
very clever!
Awesome! 😀
Another thing you can do is make magnets out of buttons! It requires pliers to get the pointy part out (which is annoying and hard), but once you pull that out it’s simple to hot glue a magnet on the back ^_^ So now my fridge is covered in ponies thanks to Hot Topic!
But these are much fancier!
I love these and want to make these over the summer, but there is one part I am a bit confused on. When using the magnet, do you attach it to the back side of the bottle cap (where the beer logo is) or do you place it within the cap and have the resin poured over the top? Does this change the strength of the magnet’s pull? Nothing is worse than having a magnet on your fridge that can’t stay attached!
I’d guess that if you had a strong enough magnet, it should be fine. You just wouldn’t want a wimpy one. I have a couple magnets I made with bottle caps (logo side out and not as fancy), and they all hold on the fridge even though some of the magnets don’t touch the surface (because they sit in the recess of the cap).
The magnets we bought for the bottle caps are extremely high strength so they work fine from the inside of the bottle cap with resin and stuff in it and still hold stuff on the fridge!!
Ooh we made bottle cap magnets for our wedding favors last year! They were a hit. We made four different styles. My husband did cartoon drawings of us and we also used our wedding logo and the date. Each guest got a matched pair. I’ll have to share pics later.
Please do! That sounds awesome.
What kind of paint did you use? Does tempera paint work, or will it chip off? Very cool project!