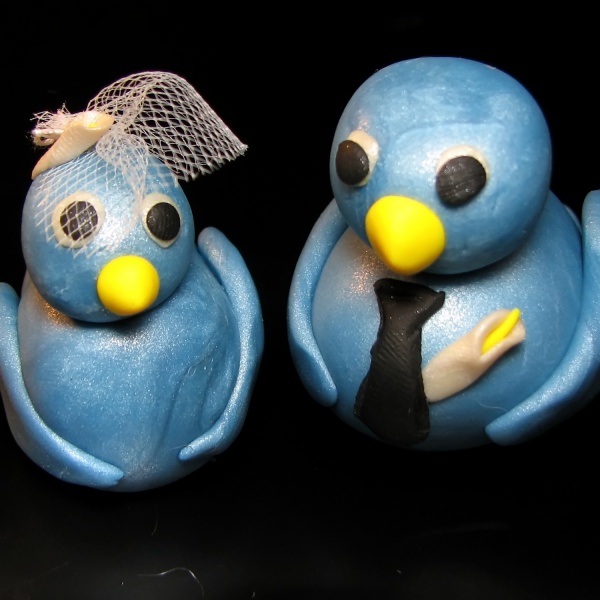

 I would like to introduce you to our birdie cake toppers of cuteness! Now, perhaps I am more proud of these than I should be… after all they are not perfect. I can see my fingerprints in parts and they are not perfectly symmetrical, but they are to represent us and we are flawed. Besides that, I am not a sculptor, and I have never considered myself crafty.
The cake toppers have been my wedding DIY albatross. It actually never occurred to me to craft anything for the wedding. I buy things. That is how I roll. But my fiance expressed that he had faith in my never-used crafting abilities, so I give it a go and, as usual, he was right — I CAN do this stuff. I can craft all the things! I would never be able to get things done if I insisted on perfection so my DIY goal is always to get to “good ’nuff.”
If you want to make birdies from clay, give this a try.
What you need:
- Clay. I used Sculpey — 1-2 blocks of the main body colour (blue), a beak colour (yellow), flower colour (white) and black for eyes and a bow tie
- Rolling pin (I used a water bottle to roll)
- Assorted clay tools
STEP 1
I found the clay really likes to be rolled up and manipulated and warmed in my hands. To make the bodies I first made blue balls (hehe) then shaped them a bit like eggs as I rolled. The boy-bird is bigger because I am quite short and he’s rather tall, so it amuses me.

STEP 2
I rolled smaller balls for the heads and set them back a bit so the chest puffs out a little. This helps for attaching tie/boutonniere details.

STEP 3
I also found rolling out cylinders made it easy to cut off equal sizes for wings. I liked making the wings by making tear drop shapes then rolling them out (I used a water bottle to roll). I used the tear drop shape to make a tail as well. I bought these yellow plastic clay tools and used those for adding a bit of detail to the wings and tail.

STEP 4
I then made the beak — this was really easy, just a ball pulled out to a beak and flattened on the other end. Since I was working with yellow, I made the yellow stamen of the calla lilies because they are easy to smush into shape out of clay as it’s a single petal wrapped around a centre and done.
TIP: Work with only one colour at a time and scrub your hands before switching colours.

STEP 5
I moved onto white which I used for the eyes and the calla lilies. The eyes are just tiny circles flattened.

STEP 6
I finished off with black clay for the eyes. I rolled the clay out flat and cut the tie before attaching it.

STEP 7
Bake the clay according to the package directions.
STEP 8
While the birds cooled I made the veil by gathering tulle together with a few stitches. Once the birdies were cool enough I used a toothpick to manipulate the glue from my hot glue gun into just the right place for the veil.



14 responses to “Even the craft-impaired can make these adorable birdie cake toppers”
I’m sorry, but all I could think of when I saw this post was PUT A BIRD ON IT! (http://www.youtube.com/watch?v=0XM3vWJmpfo)
I was introduced to that after we put birds on everything and I love it! It makes me even more inclined to PUT A BIRD ON IT! We both love birds and they will be a big part of our day. No need to apologize – it is too funny!
PUT AN OCTOPUS ON IT is the new “put a bird on it.”
Which makes me so mad because my love of scuba diving and my aquarium wedding now makes me look trendy lol. STOP FOLLOWING ME TRENDS!!! haha
Resist fretting over trends. Like it because you like it, and nothing else matters. 🙂
So true! Birds have a lot of meaning for my fiance and I, and have since we met. I stumbled across the “put a bird on it” stuff on Offbeat Bride…I had no idea it was a THING…We just love birds! For a moment I was really bothered to find out we were part of a trend but my fiance pointed out that it was something we love and putting a bird on it is funny! Besides, birds are not only cute but easy to craft.
I just watched that video and I couldn’t stop laughing!
I think I said this before but I like the idea that your fingerprints are in them – just kinda adds something to it! They really are yours.
They are really cute 😀
These are awesome, and mad props to you for taking on craftiness. Thanks for a fantastic tutorial! 🙂
I made my meerkat cake toppers of awesome. Yes, they’re clearly handmade by someone who is crafty but not a pro. And from some angles, yes, they look a little creepy. But I LOVE THEM and everyone else can suck it 🙂
Your birdies are delightful!
As for trends…I decided I wanted a pick and mix candy thing before I knew ‘candy buffets’ were a thing. Meh. Ours will be cooler and better and cheaper. And also NOMS. YAY!
If you want them to bake faster (and use less clay) start with a ball of aluminum foil in the middle! Cuts down substantially on baking time for you, and a great tip for thicker sculpey pieces.
This tutorial is awesome! I was planning on making panda toppers, but had no idea how to really do it. So, yeah, thanks!
SO cute. Cant wait to make my own! Thank you so much for sharing!
These worked out well on the actual cake – I was not sure since our wedding was a destination wedding and I was not sure what our cake would look like but see for yourself! http://www.flickr.com/photos/cerulean_blue/8114530372/in/photostream#