I've had several people request a tutorial for the Dungeons and Dragons dice mold that I created. So, here's my step-by-step tutorial for how to make this:
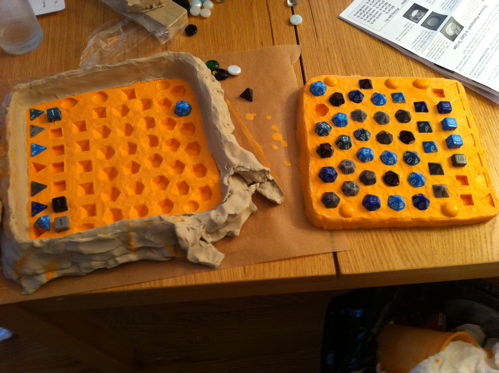
So that you can make these:
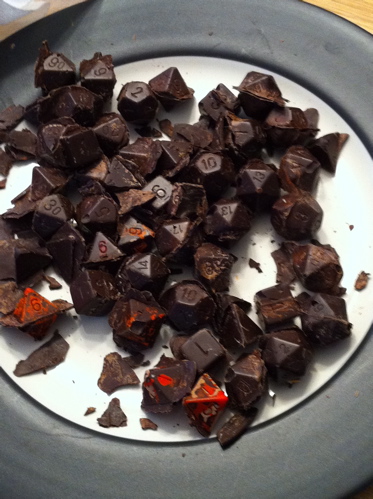
Before we begin, some disclaimers.
- First and foremost: This is about as complicated and expensive (net cost: $100 + shipping) a mold as you're likely to get, for anything reasonably sized. (Well, unless you want molded daleks complete with little plunger-arms or something else that is fundamentally not a convex shape.) That's because it has a lot of little, tiny, fiddly pieces, and it's a two-piece mold meant to create solid 3D shapes with no flat back. And the little fiddly pieces are of variable depth so you need way more silicone than you would if, say, you were just molding your favorite buttons. Chances are, your mold doesn't need to be this insane. But that's fine! You can still use this tutorial, just skip the pieces that are clearly irrelevant.
- Second: I learned how to do this from MakeYourOwnMolds.com. Not only do they sell all of the materials you need for food-safe custom molds, but they have excellent YouTube tutorials. If you decide to do a project like this, I do encourage you to go look around their site. That goes double if you're doing a one-piece mold of a single object; they have other products that are much easier to use than the liquid stuff for simple projects.
How do make your own D&D chocolate dice mold
Materials:
- 7 sets D&D dice
- 5 lbs two-part liquid molding silicone (NOT latex)
- 4-5 lbs food-safe modeling clay (you can get away with less, but I'm not that good)
- Food-safe wax (“Release-Dit” is the silly brand name)
- A handful of simple 3D objects to make the mold alignment slots/tabs. (I used the flat-bottomed oblong glass marbles we use for counters in board games.)
- Disposable containers for mixing the silicone in (large Chinese soup containers are great)
- Sturdy disposable stirrers for stirring the silicone
- A flat container at least as deep as a standard baking dish, large enough to hold all of your dice spread out; or, more modelling clay, parchment paper, and patience. (Note: you will be shoving modeling clay into said flat container. A smart person would probably not have put modelling clay directly into her good baking dish. Not being a smart person, I can tell you that it's a bitch to clean; you might want to use a disposable container if you can find one that's big enough. You definitely want something with smooth walls, though, because the silicone will ooze into everything.)
- A kitchen scale, or measuring cups you don't care about (improvised will do, as long as you can evaluate equal amounts of two liquids)
- A natural bristle paintbrush that you don't mind throwing away when you're done. (Two if you're making a very detailed two-part mold.)
We're going to be molding this in two halves, so that we can separate the halves, fill them, empty them, all that good stuff. However, silicone is thick stuff; we can't just stick the dice in a layer of it (which would be the easy approach), because they'll float rather than staying at the level we want. So instead, we're going to mold from the top down.
 Geeky wedding favors for every genre of geekdom
So far on my quest to help you find the perfect wedding favors I've profiled edible favors and rock 'n roll favors and in this... Read more
How to make your own Dungeons & Dragons chocolate dice mold PART ONE:
STEP ONE:
You'll want to put a layer of clay into your container that's deep enough to hold all of your dice to the level you want one-half of your mold to be. (For everything except d4s, that's “halfway.” For d4s, you're basically going to have the entire volume of the die in one half, and just enough depth to mold the numbers in the other half.)
Get the surface reasonably flat and smooth; this will become the model for your mold's dividing surface, and it'll be easier to clean if it's not rough.
STEP TWO:
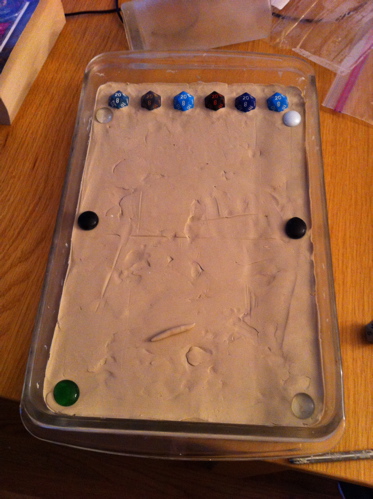
Push your alignment markers into the clay, making sure that you have at least one per corner. (I ended up doing five, so that I couldn't accidentally rotate one half of the mold; in this picture, you see six because I wasn't yet sure how much of the clay base I'd need for the dice.)
STEP THREE:
Then, begin inserting your dice one by one to their dividing line. Make sure to leave at least a quarter inch of space between them at the narrowest spots; any less than that and the silicone may be too wobbly to get a good shape.
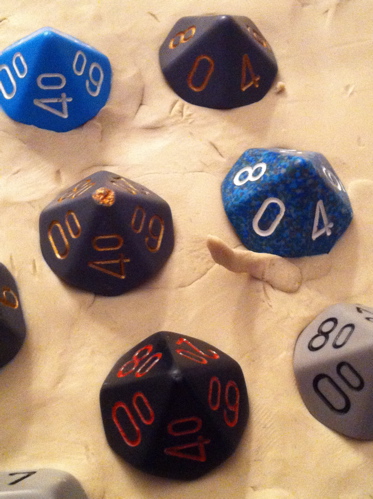
You will notice shortly — probably when you get to the d10s — that many dice do not actually have a simple horizontal dividing line between the “top” and “bottom” halves. Instead, they have a jagged edge where the faces meet. This is rather inconvenient, since silicone will creep under any exposed surfaces and create molds that have a little inward divot. We'll just have to live with some of that — after all, that's the shape we're trying to create — but we want to have as little of those fragile lips as possible. (Remember how I said that less than 1/4″ of silicone isn't reliably stable?) So when putting dice in, I found it helpful to use a little extra clay to fill in some of those hollows, just a little bit.
Remember, it's not the end of the world if the final mold surface isn't perfectly flat; we just want it smooth enough to easily scrape/scrub clean.
STEP FOUR:
Once all the dice are inserted, you may discover that your container is too big for your dice after all. If so, build yourself a little clay wall, like so:
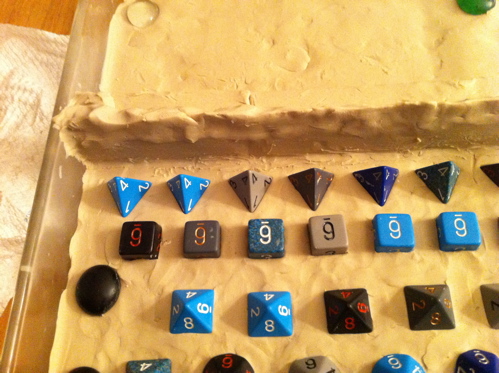
This will make sure you only use the silicone you need, and don't waste it by filling unnecessary space. Note how the clay there is actually rubbed up to meet the wall of the dish: the silicone is liquid, and *will* get into cracks if you leave any. And then your mold will have little stringy bits, and you'll have to cut them off, and that will just be annoying. So be sure to smooth your edges together.
So you should now have a final “master,” that looks something like this:
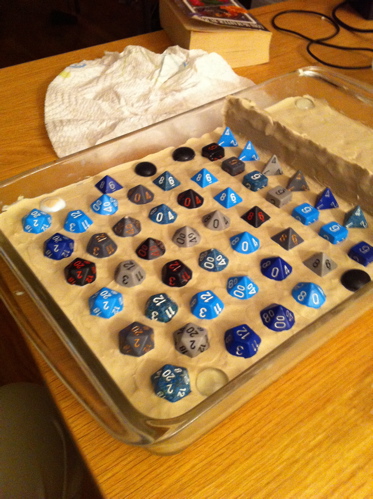
(As an aside: Note how mine is crooked and tilts slowly up as it goes left? Yeah, the final mold ended up lopsided too. It's usable, but annoying. Don't do that. Silly me didn't think to look from the side when deciding whether the clay was flat.)
PS: If this seems like wayyyy too much trouble, you can always just buy one of these.
STEP FIVE:
Next, we're going to mix the silicone. With the stuff I used, it's a 50-50 mixture. I did an initial volume estimate in water, divided that in two, and used that to measure the amount of silicone I'd need.
Do not use your good measuring cups for this step! I used my good measuring cups for this, figuring that stainless steel would be easy to clean. Unmixed silicone is sticky. Very sticky. Also not water-soluble, and soap is only of limited use. Don't make my mistake; you'll regret it for the next three weeks of scrubbing. Use, say, smaller Chinese soup containers instead. Or use a kitchen scale to get 50-50 weight ratios; it'll be more accurate anyway.
Also note that when combining silicone, it is really important to get it well-mixed. If you think it is well-mixed, it's not; scrape out the bottom and sides some more. This stuff is thick and sticky.
STEP SIX:
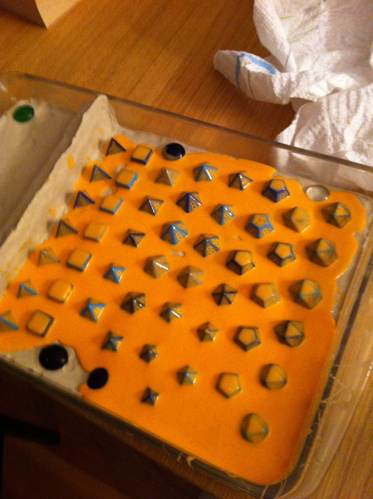
You'll want to mix an initial small batch, using a subset of your final volume. This will be used to brush into the cracks and fine details in your master: in this case, to highlight all the numbers on the dice. You'll also want to use it to get a thin coat of silicone around the final surface of the mold: all of the major edges, the top, etc. This is to prevent annoyingly-located bubbles from causing problems with the final casting. (It isn't critical that you get to the edges of the dish; after all, that's just aesthetic.)
STEP SEVEN:
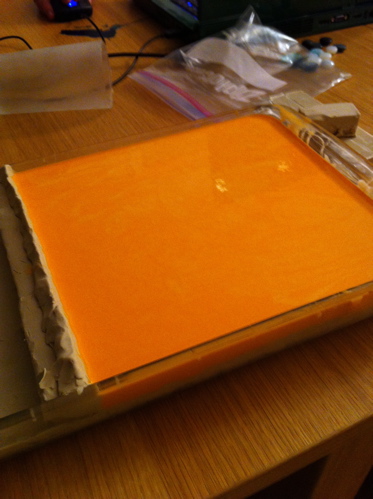
Next, mix the rest of the silicone for this half, and pour it in, as far from the critical components as you can without splashing. Make sure to fill to a depth of at least 1/4″ beyond your tallest object; make a note on the side of the container before pouring if you need to. You'll end up with something that looks (with my silicone, anyway) disturbingly like a casserole dish full of Velveeta.
STEP EIGHT:
Let it sit for at least four hours, or whatever it says with the instructions for your silicone. Overnight works great. When it's done, it should be solid, not even a little bit sticky, and if you press it with something thin like a coin, it'll just spring immediately back into shape without leaving even a temporary dent. In other words, it'll look and feel like solid silicone. Remove it from your container; don't worry about prying a bit, it's tough. Peel off any clay that's stuck to it, and voila:
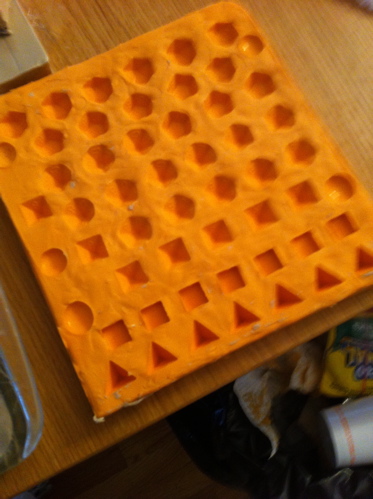
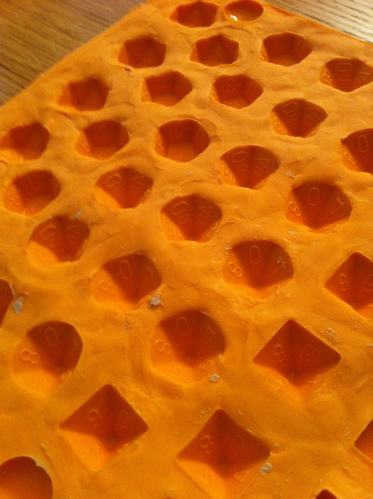
You've got half of your mold! If you want something with flat bottoms — say, you want to decorate your cake with half-dice, or whatever — you can stop now. Otherwise, on to Part Two!
How to make your own Dungeons & Dragons chocolate dice mold PART TWO:
STEP ONE:
First, liberally coat your shiny new mold with your Release-Dit or other handy-dandy wax. Wipe off the excess; you just need enough that the next batch of silicone won't stick to itself, not so much that you get lumps where the wax was. And then go through and put all of those dice back into the mold, being sure to align the numbers correctly. (You may need to rub them down in paper towels to clean the excess clay off; remember, you want those numbers clear!) Do NOT put your alignment components back in: the whole idea is that you'll have a raised piece of silicone in the other half of the mold that you can slot in when you're creating your real objects.
STEP TWO:
Put the mold back into the container, once you've removed the clay; or, if the container didn't have straight sides so your mold won't fit, or if you forgot to put plastic wrap at the bottom of the container so you get fed up trying to get the clay back out (oops), put the mold on a piece of parchment paper big enough to protect your table from leaks and splashes, and use that extra clay to build a wall around it on all four sides, remembering to smooth the clay to prevent leaks. (Sorry, didn't get a work-in-progress photo of this one.)
STEP THREE:
Use the same technique as before to mix a little silicone and cover the surfaces and details, then a large batch to fill in. Let set, and voila:

STEP FOUR:
Remove the dice, clean off clay and wax with a quick scrub in the sink (non-scratching sponges only!), and you're ready to go. You may see a few flimsy little raised edges in the new half, from where silicone leaked under dice without the clay barrier; you can use an X-acto knife or small sharp scissors to cut those off, but small firmly attached ones won't do you any harm.
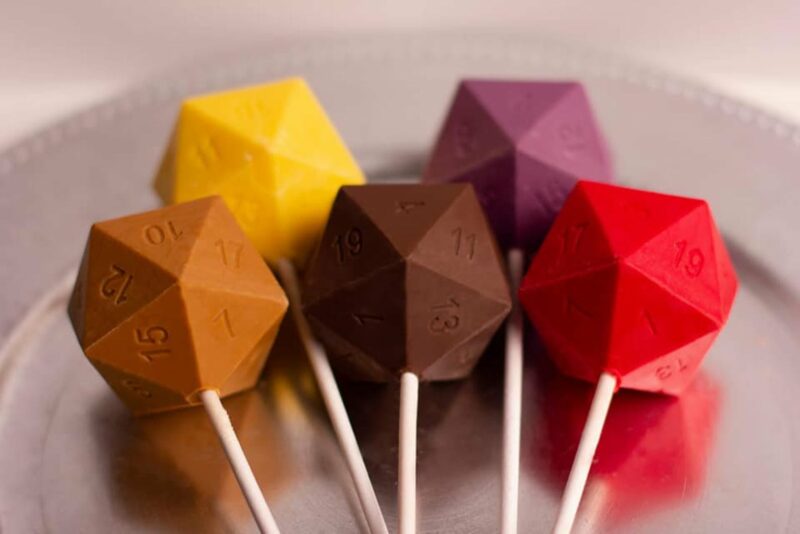
And there you have it: one 3D mold for D&D chocolate dice.




Well, unless you want molded daleks complete with little plunger-arms
I do now!
LOL me too!
Amazing! I’m totally inspired to try making a bunch of different molds now!
I am really confused by the last picture. Why are they bright orange underneath the chocolate? They look like dice covered in chocolate rather than chocolate dice.
I just sent this to all my DnD playing friends and they loved it, but I may agree that it would take a very special occassion for me to actually do it!
The orange isn’t underneath the chocolate; it’s on top! That was part of an experiment in coloring the dice. It’s colored cocoa butter that I painted the inside of the mold with in various designs. (Think thin chocolate paint.)
And yes, they do look like real dice colored like that, don’t they? I really like the effect.
How do you get the chocolate in the completed mold without building in pour spouts?
There are several ways, but the way I’ve found is easiest is to just put tempered chocolate in both halves to *just* over the line and then squash the mold together very firmly. Unless you’re working very slowly or in a cold environment, at least one half of the chocolate will still be liquid enough to flow and stick the halves together; unless your chocolate is very warm and you’re working very quickly, it will be too viscuous to pour everywhere and make a huge mess. If you take this route, a couple of warnings: you’ll want to be careful when you lay the top half over the bottom to trap as few air bubbles as possible between the halves; you’ll want to shake and tap the mold a bunch before you squish it all the way together to chase the small bubbles out; and you’ll want to do this on a big piece of parchment paper, because there *will* be drippy (tasty) mess.
Pour spouts work great for bigger pieces, but on something this small and for a material as thick as chocolate it didn’t seem like a good idea.
I work with hard candies from time to time, and a D20 would be fantastic to have a mold for… still trying to figure out how to get them into a mold like this mold though. i think pour spouts would be the only way.. as candy probably dosn’t smush together as nicely as chocolate. recommendations?
I played with casting chalkware from candy molds for several years. I’d go with pour spouts too but another options would be to fill both halves, let them set up and then paint a ‘slurry’ over them (or in this case just enough warmed chocolate or candy to do the trick), and use that as the “glue” when you put the halves together.
This was an interesting tutorial. I’ve made my own molds on a much smaller scale but haven’t worked with silicone. Thanks, I enjoyed reading about the authors adventures!
How safe is it to heat or warm the silicone molds? I’m thinking a way to make sure that it all sticks together with minimal mess would be to warm the chocolate in the mold after it has started to set up.
They’re safe up to I think 400 or so? The problem is getting the chocolate to be soft enough to stick together without losing the temper. If you use candy melt, you’ll have an easier time.
That said, I’ve also found a wonderful new trick: rubber-coated baby spoons! They’re exactly the right size to fill standard dice molds, so I can do them at three times the speed I used to manage, and I no longer have nearly the same kind of problems with the dice setting too fast.
So, looking at your site… would you be able or willing to do something like this in a vegan chocolate?
This is here as a fun how-to, not a business ad; contact me via the website listed in the author section, it has an appropriate e-mail address. (Short answer: Yes, vegan chocolate is easy as long as you like dark. It’s in the FAQ, I believe.)
I was about to ask the same question :). Are you doing these? I so NEED to! 🙂
Most importantly, how well do they roll?
I think the appropriate action is to use them in a game and whenever they roll a 1 you eat them.
OMG our dice! 😀 These were as fantastic as they look, and twice as delicious. Our guests absolutely loved them, even the people who had no idea what they were, lol!
Pics from our reception:
http://www.flickr.com/photos/tychesecho/6238622612/in/set-72157627884770760
http://www.flickr.com/photos/tychesecho/6238100767/in/set-72157627879596366
http://www.flickr.com/photos/tychesecho/6238623396/in/set-72157627879596366
They didn’t roll completely perfectly, but they were good enough to have fun with at the reception. And then we ate them. 😉
Thanks again, Ariel! 😀
whoa. “White chocolate pumpkin spice” ALMOST makes me want to try white chocolate!
It was SO good, and I don’t usually like white chocolate! This was good stuff, not the cheap stuff you buy at Easter. Yum!
(Comment reply fail, trying again!)
white chocolate is great for flavoring because it has the texture of chocolate but takes flavoring/coloring easier
“You will notice shortly — probably when you get to the d10s — that many dice do not actually have a simple horizontal dividing line between the “top” and “bottom” halves. Instead, they have a jagged edge where the faces meet.”
What about putting the d10’s sideways?
OK, I now have *data*! I made another mold, and have discovered that I was right the first time about how to handle d10s, but wrong about the reasons. The nice thing about doing the d10s vertically and making the silicone uneven to match the uneven edges of the dice is that it makes the inevitable molding lines blend in with the rounded center-edge of the dice. (This obviously doesn’t apply if you’re using the more accurate crystal dice, but hey; I was going for iconic looks, not good odds.) If you leave the silicone flat, or put the d10s sideways, you’ll get at least one molding line in the middle of a face, which shows a *lot* more and generally makes the die look less well-put-together.
Important note when working with silicone – while it can be helpful to wear gloves while mixing/pouring do NOT wear latex ones, or let latex near the curing silicone, or it won’t cure completely and then you’ve wasted good $$ in unusable molds
most places that sel disposable latex gloves also sell thin plastic ones and or vinyl also the Purple ones you see being used on tv shows recntly arnt Latex either there some other material that has become popular BECAUSE it’s just as pliant as latex but it’s inert
Whoah — these may be the perfect dice. When they start rolling badly, you eat them!
I’ve been looking for a good way to make game pieces for Thud out of chocolate. Looks like it’s entirely feasible to do short runs at home, and I don’t need to spend thousands to get it done professionally. Yay!
No need for any fancy-pants shaking-beds or centrifuges! I have been lied to by the professional chocolatieres!
Only thing is, I’ve a friend with anaphylaxis to latex: deathly allergic to the point of not being able to handle newsprint, nor to be in a house with air conditioning where a balloon has recently burst or people have been using erasers in case her throat swells to the point she can’t breathe, etc.
She’s never mentioned an issue with chocolates or other molded candies, so I suspect that eating the chocolate would not be an issue (though I’d let everyone how they were made, so they could make their own decisions), but latex anaphylaxis is something I’d definitely worry about when *curing* the latex, since she can’t be in a house with drying latex paint, and that’s probably a similar thing.
Possibly something for others to bear in mind too.
Also, from my experience, curing latex smells strongly of cat urine. If this stuff’s the same, you might want to do it somewhere with good air flow even if you know all your friends aren’t sensitive to latex! 😀
This is silicone, not latex, so it shouldn’t bother your friend at all! Most food businesses ae completely latex-free nowadays for exactly this reason.
The shaking-tables are really handy, but easily imitated using these handy things called wrists. 🙂 your arms get a bit tired, but it’s much, much cheaper.
UNLESS you’re like me, and allergic to silicone! (Bad when you wear glasses and end up with silicone nosepads; now I have to specially order non-silicone ones with every new pair of glasses.)
But, on the other hand, silicone doesn’t seem to leave a residue, or not enough of one to bother me, so as long as I don’t touch it for lengthy periods, it should be fine for projects like this. As long as I don’t actually use chocolate, either, since I’m allergic to it. (yay, since I can’t stand it)
BUT, now I’m wondering, what about GUMMY DICE?
Anyone worked with making those?
Oh, and curing silicone, at least this kind, is happily scent-free. The only annoyance is that the little drips are really sticky.
If you’ll insert the d10’s sideways into the hold, you won’t have the divots that from the centre line.you’ll have a four-side top line, two sides will be the line between facets, and the other two will divide a facet.
Ariel, I read this post, then saw your bio. You sound like an amazing and highly accomplished person! Obviously this chocolate mold idea is brilliant.
These are awesome! Since you mention it at the end of the article: How much would it cost to order the chocolates from you since I live in MA (relatively) close to Boston?
Please contact Ariel directly via her website if you want to talk business. 🙂 http://www.chocolatesbyariel.com/
why did you bother with the percentage D10’s nobody really even uses those anymore ESP not in D&D
Actually, the Chaosium system (the system that Call of Cthulhu is run out of) is played exclusively with a set of percentile dice. Also, fore some the mere fact that they come in a set of dice is enough for some people to consider them worth the time.
My fiance and I met at a D&D game and he bought me my first set of dice. These will Definitely be the favors at our wedding. 🙂
When we played Marvel, we only used the D10s and I’ve used them for both percent chance and when my rangers were leveled up and for damage on certain weapons.
Exactly! There are so many uses for d10s, you just have to know how. 🙂
Two words: White Wolf! And since you can use percentile d10s just like “normal” d10s, who cares if there’s an extra 0?
I… may have an awful lot of d10s lying around in my dice bag. And yes, a d10 only mold is on my (long) to-do list…
Percentile dice are used a lot for rolling on random tables, and some systems are entirely percentile-based – including Chaosium (Call of Cthulu/Runequest), as well as the FFRPG and several others! GMs often use percentile dice more than players do in things like D&D, moer than you might realize.
This is really awesome, thank you! I’m trying to think of geeky things to make for the Cookie Brigade for this year’s PAX East, and while this is a little involved, I’ll think about it!
Do you think this could be done as Gummy Dice as well?
Good question! I’ve never made gummy anything. I don’t see any reason why *not*, but I’m not sure whether the two-glued-together-halves approach would work as well with gummies. I’ll have to try it sometime.
That said, there’s someone else on the net with a three-part instead of two-part dice mold design that can be poured into; no reason you couldn’t use that for gummies. (He doesn’t have a step-by-step guide to making them, though.)
I LOVE THESE! That was a labor of love or insanity. But they’re amazing! 🙂
I like “or”. It was probably “and”, though. 😉 Thanks!
This is really nice! But what I really like is that you founded the Laboratory of Chocolate in MIT, congratulations!!
This is a fantastic tutorial. I am looking forward to making some chocolate d20s.
When I’ve done (non-food safe) moulds before, I used Lego to build a fence around the mould. You can adjust the lego pieces to whatever size mould you are making, it gives a nice, clean-looking edge to the mould, and I suspect that many people making d20 chocolates have Lego kicking around their apartment.
Hello Ariel! I absolutely fell in love with the idea of making d20 chocolate/candy molds and decided to try it out for myself. After two tries using Make Your Own Molds’ Copyflex (food-safe liquid silicone)I keep running in to the same problem. No matter what I try, there is always an awkward seam where the two halves of the dice meet. It looks like you have the same problem in some of the dice depicted above. Have you found any way to avoid this? I keep trying different techniques, but I’m beginning to worry I’ll never get a perfect chocolate d20 ;_;
I always have seams, but they’ve gotten a *lot* smaller with practice, and can be shaved off to near-invisibility with a good sharp knife.
The way I reduce them is to keep the “glue” layer minimal, by slightly underfilling the halves, and then just *barely* overfilling each one right before I stick them together; then apply serious pressure from the center of the mold outward to push the excess chocolate out the sides. It takes a little practice, but it works! More alignment guides also improves the matching between the halves, which makes what molding lines you’re left with less obvious.
The other technique that I’ve seen someone do to minimize mold lines is to build a mold which is in three pieces, and filled from the top: one piece is the bottom half of the die, one is the top-up-to-one-face, and the third impresses the number on that face. These are much trickier to build, and work best if you’re doing all of one kind of die (getting that alignment to work with d20s and d10s and d4s in the same mold just gives me headaches thinking about). But you can try it!
To get perfect lines on the D10s, D20s or any zigzag-circumferenced dice, here’s what I do: simply push the dice into the clay such that the circumference still remains above the clay base. Next, use a little clay and any flat tool (I use exacto blades and wax sculpting tools) to build up the clay edge so it matches the zigzag edge of the dice. This will force the first layer of silicone to the line that you have now defined (perfectly!) rather than the flat level of the other dice. You can even do this with D6s so that a single vertex is nearly vertical, allowing for much easier pouring or venting. For simplicity of use I think adding sprues (pour spouts) at the very least would be a huge improvement. You could extend this to use a simple common runner configuration leading to vents at the top-most dice vertexes would result in a really nice (and usable) mold. Finally, polyhedral dice are available by the pound (on Amazon and other online gaming stores) – they’ll save about half the cost versus the common packaged sets of 7.
I found a dutch site that sells the sillicone too. They have some examples of what you can do with it. They even baked cake in those molds! Rubber duckie cake!
http://www.siliconesandmore.nl/nl/products/culinary-art/examples.html?___SID=U
I’m thinking… large circle of fruit leather (fruit roll-ups) laced with long thin twizzler…edible dice bag to go with the candy dice. lol
I can only suggest to us, for the mixing of silicne a rubber cup…..every paintshop has it, or should, and if not then shame of them and roll for damage with 2d6.
-So a rubber cup is a hard rubber, from wich the “dried” rubber can come off very easily( I suggest to wash it before the first use). Of course sime residues will be remain, but most of it can be remove even by hand.
-For stirring use those architectures spatulas from stainless steel.
-Buy a scalpel wich has those fragmented disposable blades (also from the paint shop), to be able to cut of the dried excess from your spatula
-Put the rubber cup on the kitchen scale and measure the silicone like that(even you can put some other protective stuff on the scale to go for sure as long as you can Tare)
-If you happens to have a sculpting tool, that’s the best thing)
Rest of it OK. (I’m doing little minature sculpting cast from resin by using silicone, wich I form by myself, so technically I’m ready to do this, just has to order some stuff more “stomach friendly” for this)
Oh…and instead of “standard baking dish”…use LEGO……(wash it before)……
-Put the clay(if you use non air drying clay) in front of something hot….radiating hot, for 2-3 mins (fragment the clay to make it mre easly to be exposed by the radiation), and after when its more handle-able.
-Put the clay on a paper, wich you placed on a table, wich you placed wherever you wanted
-Use a rolling pin, to do the “flatting” (even treat it as you do while cooking some cookies, so roll it and form it..)
-Build a Lego frame wich is big or small enough for your plans.
-Push it to the clay, to leave a mark
-Remove from the clay
-Put the dices however you want (see the articel above It’s AWSOME)
-Put back the framework and make it sure it will stay there
-Have the rest of the FUN
(you may use either duplo or the classical ones, If you think there are hole between the bricks feel free to cover them with clay, or whatever…but if you dont it wont let all of your silicone goes away…(okay this one I’m not sure cause I using RTV(2) DC wich has different characteristic)
-for the other side you just only have to remove the clay and clean it and cut it where it is necceseraly
-remove some lego wich is an esxcess according to the topside and build them to the downside, so you have your framwork for the other side.
-Do the things wich is in the article
-After you finished, you just had to dissemble the lego brick framework and you can do the separation and stuff
Am I the only one who saw this as a two piece mold and just didn’t think it necessary? Seems to work pretty well just making a one piece mold. Just gotta be a bit more careful when removing the d10s and d20s, but I had very few issues with it. Great idea, but cost me way less just making the one-piece mold (in fact cost me nothing because I had some left over silicon from my previous sculpting and casting project, but that’s besides the point lol). Great article though, thanks for the idea.
If you have a silicone for food sculpting puproses and it can bear the giving birth of dices through a small hole, then good luck, but most of the food friendly silicones are kind of tearing apart when trying to be “tricky”, and using real force on them….because regular silicone which could be use for casting full dice in 1 part, (and like using of of the dice edge as a castin in hole or what is it called) are sort of full of heavy metal residues….sooo….but if you don’t mind losing 1 side from from each die…
play dough works just fine as a cheaper alternative to clay 🙂
and coconut oil works just as well as releasedit!! much cheaper too