

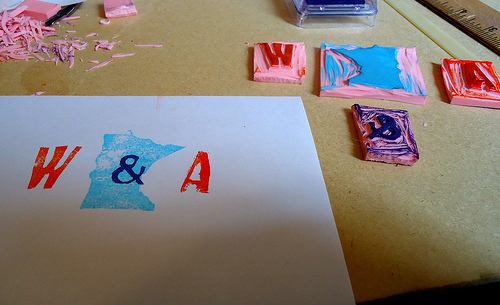
 My future wife and I wanted to DIY our invites from scratch. So, I found these cute print-yourself blank invites and we’re adding our Minnesota outline wedding logo to the cards via lino block stamps.
I never realized how easy it could be to make my own block printing supplies! Here are my very simple DIY instructions on how to make your own lino block/rubber stamps for all your wedding needs.
Supplies:
- paper
- ink or pigment (I used a stamp pad)
- Lino Block (I used the Speedball Speedy-Carve Block, which is a softer pink material similar to an eraser)
- Linoleum carving tools (Again, I went with Speedball brand.)
- Either a printer (laser or ink jet) or tracing paper or just a pencil
Step 1: Design and Transfer to Lino Block.
The first thing you’ll want to do is create your design. Once you have it down, there are a few options.
- Laser Printer: This is how I did it. I printed the logo out on a laser printer. Then I cut the print out to the size I needed and placed it face down on the lino block. Then I wet down the paper with acetone (I used pure acetone nail polish remover.) Let it dry completely. I found that it was easier to leave a small flap to the side of the design and fold it over as a small ear flap so that I had something to peel the paper off with, because it can get a little sticky. Once it is dry, slowly peel the paper off. The image might not be super clear, but you can clean it up with a pencil. I like to print mine with the design in white and the background in back because then I can just carve off the black areas.

- Ink Jet: This is done very similar to the laser printer. Print out your design, place it on the lino block, and use water or vinegar to wet down the paper. Using a spray bottle works well for this. (I have found the vinegar works better.) Rub the back of the paper GENTLY with your fingertips. Make sure you don’t slide the print around. It will smudge the transfer.
- Tracing paper and pencil: Draw the image onto the tracing paper. Use a heavy hand with the pencil to leave a good layer of graphite. Place the image, graphite side down onto the lino block. And rub with your fingernail or something else firm to transfer the graphite from the paper to the lino.
- Pencil: Draw directly onto the lino block!
Step 2: Carve Your Block
 You’ll find the way that works best for you to hold your carving tools. I hold it similar to how I hold a pencil. Using the finest blade I have, I carve out around the image first to give myself a good solid border to work around. Then just carve all of the dark area or the area that you don’t want to hold ink.
Step 3: Ink The Block
If you’re using a stamp pad, this is as easy as touching the block to the pad. You can also purchase a roller to roll liquid ink over your block, but the ink pad works great for my needs.
Step 4: Check Your Print
Set the block down onto a piece of scrap paper and verify that the image is showing up the way you want it. Tweek your carving to make it exactly right. If there are edges that seem to be picking up ink, let the ink dry on the block and then just carve them down to a reasonable level. Make sure there is still room for you to pick it up by the edges.
Step 5: Stamp Away!
That’s it! It was SO easy and ends up looking incredibly cute. What I thought was going to be a wedding project is easily going to turn into an obsessive hobby for me. It’s so much fun and so very very simple!










8 responses to “How to make your own lino block rubber stamps for all your wedding needs”
Cute idea! I might steal this. I want to make heart stamps with me and my beloved’s first initials using red, purple and baby pink ink.
Love lino printing! If you want more even tones, you can always use a roller/brayer to roll ink over the block and a baren (such as http://www.dickblick.com/products/yasutomo-bamboo-baren/) to press the paper down on top of the block to get more even ink coverage. Also, if you’re not doing a transfer and just going right to carving, remember to make your design backwards from what you want them to print, I learned that one the hard way 🙂
I just ordered stamps online, but that’s definitely a cool idea. I wanted a lot of detail in my design, there’s always the thank you cards 🙂
Ooh, I love carving stamps! Just one word of warning: the soft lino blocks do degrade over time, and can crack in half if you’re rough with them. So for heavy use, you might try this (or something like this) –
http://www.dickblick.com/products/blick-battleship-gray-linoleum/
I love seeing people doing their own printing! Also, potatoes work well as stamping blocks. The downside is you need to carve and then immediately stamp – no saving for later – but you can make do with a spud and a knife in a pinch. 🙂
I love this idea – and I love the idea that it is actually something I think I could pull off! Thanks for sharing this with us – it’s a great idea!!! Definitely going to try it for myself!
I came across this post just hours after deciding to use linocut to print invitations for the bridal shower that I’m helping to throw! This must be destiny. 😉 I am planning on using a single block for the whole front of the invitation, and inking different parts in different colors, to keep the entire image consistently spaced.
I will be pretty sure I’ve look at this exact same sort of affirmation in other places, it must be gaining popularity while using public.