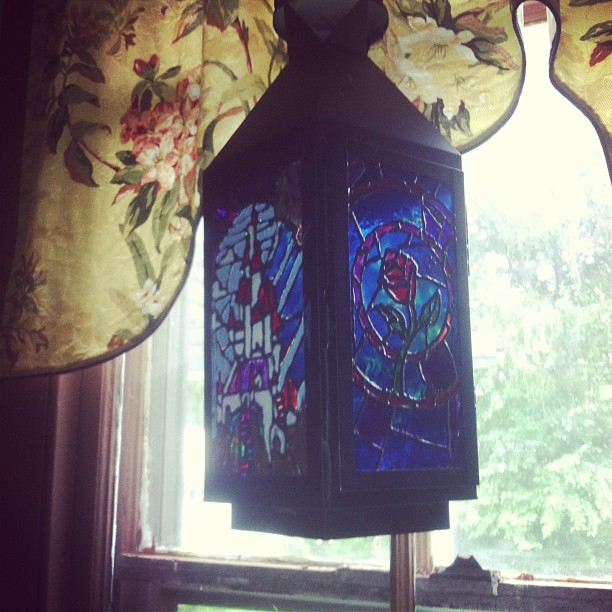
Stained-glass is romantic. Seeing it used for story-telling, as in Beauty and the Beast, makes me swoon. Since our wedding was all about stories that moved us, I knew that I wanted stained-glass artwork to factor into our centerpieces. What I didn't know was the first thing about stained-glass.
Enter lanterns, liquid leading, and glass paint…
You will need:
- lantern(s)
- liquid leading — I used Gallery Glass. For my three lanterns (roughly 8¼ X 4½” panes) I needed two 2oz. bottles to draw the rose nine times, plus the three major scenes — the castle, the enchantress transforming, and the happy ending.
- glass paint — I used DecoArt Americana Gloss Enamel. One 2 oz. bottle is enough paint for every color except blue. You need two blues, because of the backgrounds for the roses.
- Q-tips
- a ruler
- tape
- scissors
- small and even smaller paint brushes
Here's how to make them:
First, find your images. I found images from the opening sequence of the movie that I wanted to use and saved them to a folder.
Next, measure panes. Back to my folder of images I went and, looking at the rulers above and beside the virtual page of Microsoft Word, I stretched each image by its corner until it was about the size of the pane I would be painting. There are other ways to size pictures, this was just the backwards way that worked easiest for me. When in doubt, I made mine slightly smaller than the pane. It's easy to extend lines — less so to smush important stuff where it doesn't fit.
After printing the images, cut them out. Yay, kindergarten! Then, tape your first image to the inside of your first pane, facing out. Lay the lantern on newspaper so the picture faces the ceiling.
Now, use the liquid leading bottle like a tube of icing — squeeeeeze and draw. You want to trace the major lines of the image, mimicking solder; let the paint be the star.
You're also always free to leave things off. I completely ignored the beggar-woman's hand when I did the roses. Instead, I continued the background lines as if it wasn't there.
Sometimes my hand would jerk when I was drawing a smooth curve (It didn't happen often — the liquid leading is actually lovely). I found that I could use a Q-tip to prod the line of leading into place, and it didn't even leave a smear. If I squished a line while working somewhere else, a Q-tip plumped it right back up. Sometimes two lines that were close would merge (the leading likes itself), but a Q-tip swipe broke that party right up. The Q-tip also fits easily between lines of leading without disturbing them if you need to mop up some stray paint. Basically, the Q-tips make it possible for humble humans to pretend godly competence. Keep many beside you, so as not to encourage over-using a Q-tip that is already dirty (which is a disaster, don't do it, you'll be so angry).
Let the leading dry. If you happen to need everything done in like three weeks and you can only work on it while you're doing laundry at your mom's, use this time smartly: start drawing on a different lantern. When I finished drawing a second image, the first's leading was usually dry enough to start painting around. You can test dryness with a Q-tip!

Take the picture down next. Look closely at what you drew. Are any of your lines broken? Did you get close enough to the frame with the leading? Touch up any problem areas.
Now the painting… Use colors consciously so you don't accidentally turn Belle into the Hulk. Don't be scared of using a slightly bigger brush for the larger bits; the leading will keep you inside your lines. You may find with lighter colors that you need to go over the paint when it has dried. I painted Belle's dress four times.

I wanted rich jewel tones, and I didn't want to “see” glass behind the color. I used a lot of paint — enough that I was not brushing the paint in streaks so much as directing the flow of puddles. You stop when your heart says stop. Or your hand. Or your well-meaning friends and family who haven't seen or heard from you in some time.
After that it's just repeating steps. Turn the dry lantern on its side and begin again with a new picture. Do it until you're done. Vow never to undertake such a project again.
Then eat your words because they're just too pretty:


These turned out beautiful!
Thank you!
Yay! Thank you so much for making a tutorial for your lanterns. They are absolutely beautiful.
Thank you! I can’t wait to do it again… I just need a reason!