
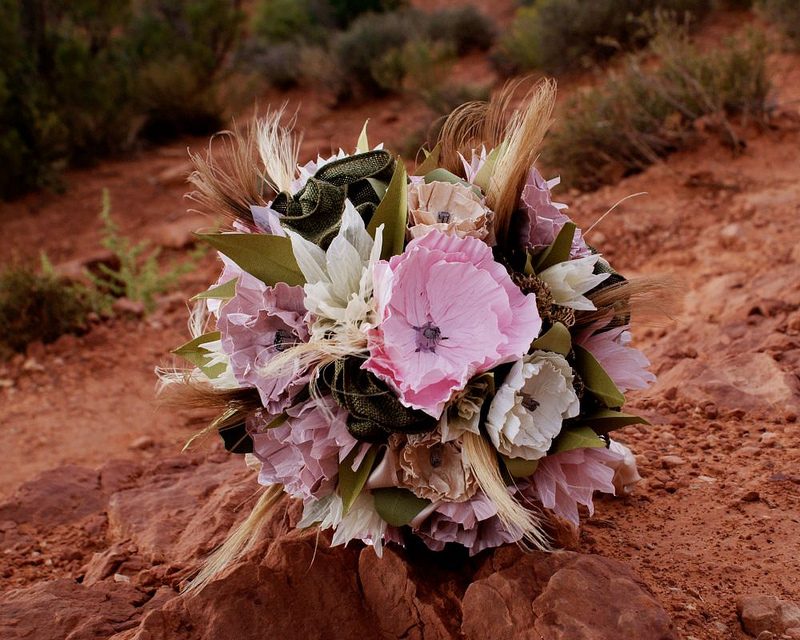

You saw Libbie & Paul’s road trip wedding and wanted to know more about how she made her travel-friendly bouquet. Here’s Libbie with the full break-down…

I love flowers and definitely wanted to have something to carry to our ceremony, but my flowers had to survive a road trip from Seattle to Moab, the desert environment, a trip back, and still had to look good a month later at our reception! That’s a tall order for a bouquet.
I ended up inventing my own method for making paper flowers that mostly involved soaking and hand-wrinkling paper, drying it, and forming it into petals and leaves. I added some bleached peacock feathers for a bit of texture, but otherwise my bouquet was 100% paper and cloth ribbon.
This tutorial is pretty simple, but it takes some time.
Materials:
- Paper: I used a fairly thick scrapbooking paper for this, not quite as heavy and stiff as tag board, but definitely heavier than typical office paper.
- Paper-wrapped wire (floral wire covered with stuff that kind of looks like paper bag material)
- Cloth ribbon and feathers for texture
- Hot glue
For the poppy petals:
- I cut out a bunch of petal shapes — just free-hand drew them in the shape of triangles with very rounded corners, made the edges of the “base” of the triangle kind of wavy and uneven.
- I soaked the petals in a dish of water for about 20 minutes.
- Then I took each petal and pinched it all together vertically (the narrow end of the triangle is the bottom of the petal, which will attach to the stem, so you want your folds and wrinkles to go up-and-down, not side-to-side.)
- Make the pinches all wrinkly and uneven — don’t try to make them perfectly even or anything like that.
- Lay the petals out on a towel on a cookie sheet and let them dry overnight. If they come unpinched a little bit, don’t worry about it.
- When they’re totally dry, gently open each one up a little bit, so you can see the petal shape again, but allow it to still be wrinkly.

To make the poppies:
- Cut a circle out of dark paper.
- Grab a petal and shape it over your thumb so that it forms a little bit of a curve/dish shape.
- Glue it on the circle at the narrowest end, with the edges of the petal curving inward.
- Do a whole row of petals around the outside of the circle, and then another row inside.
- Make the little nub at the center of the poppy by cutting a long, very narrow strip of paper, roll it up so it becomes a little fat cylinder, and glue it into the center of the flower.
- Then take a piece of the paper-covered wire and form a loop at one end.
- Glue the loop to the back of the flower, let it dry, and bend the rest of the wire so it creates a stem.
For the white lily-like flowers:
- I free-handed a bunch of eye-shaped petals on vellum paper.
- Then I just wrinkled them vertically so they looked all crinkly and textured, and glued several petals together at a narrow end, overlapping them, so it formed a bud shape.
- I added some smaller vellum petals inside to give each one some depth.
- Glue them directly onto a piece of wire.
The leaves:
- Just free-hand drawn
- Cut out.
- Fold the long way to give the leaves some shape and depth.
Then, when you have all the flowers you want, just bundle them up and arrange them, add any ribbon or feathers you want for texture and to hide any wires that might be visible, and secure the whole bunch with some twists of wire or zip ties. Wrap the stem in ribbon and glue or pin to secure it.





8 responses to “How to make a travel-ready paper flower bouquet”
Yes! I was SO hoping you would submit a how-to. Thank you SO much. This is the first bouquet I’ve seen, natural or crafted, that I truly loved.
Wow. I am generally NOT a fan of paper flowers – but holy man, if I hadn’t already booked a florist I’d be all over this. Amazing. Beautiful. So rad. Nice work!!!
I’m making roses out of book pages, I think adding some poppies would be a great addition! Thanks for the how to! They are beautiful!
I am blown away…. This is truly beautiful!!! Thank you for taking the time to give us the tutorial! I am thinking me and my little ones will try it!
Hi Libbie – where did you find the paper-wrapped wire? I am finding a lot of cloth-covered, but not the paper kind.
Beautiful work!
Thanks, guys! I just saw that this was posted, so sorry for late replies. :/
I’m glad you liked the flowers! Like some of you, I just didn’t find the usual look of paper flowers to suit my style…all the tutorials I saw produced flowers that looked a little too whimsical and fantasy-like for what I was going for. I’m glad I could help you out with my crazy experimental bouquet! (We transported it in a plastic picnic pitcher wedged between some suitcases in the back of my Hyundai. Classy!)
Liz — I found the paper-wrapped wire at Michael’s. If you poke around a little in the silk floral section of your local craft supply store, you’ll definitely find some. I think it came in packages of 12 pre-cut lengths, and I could get two stems out of each length, so I only needed one package for this bouquet.
These flowers are just wooow… dont know if these are easy to make at home but i really like the look if these ones.
You can also try these flowers here. Paper flowers
Hi. Love how you did your flowers. I’m currently thinking of doing something like that too for my wedding next fall. I’ve been playing with different ways of making them and different papers. The thing that got brought up was what if it rains. I’m in Guelph (Ontario) so the chance of rain in September is pretty high. Is there something I can spray on them to ensure they’ll make it through the day and perhaps longer? Or what other kind of paper would you recommend? I’ve been playing with coffee filter paper and tissue paper and some origami style paper my finance has. I’ve also been hand painting the coffee filter paper with paint from the dollar store.
Again great looking flowers and enjoying all the crafting here 🙂