

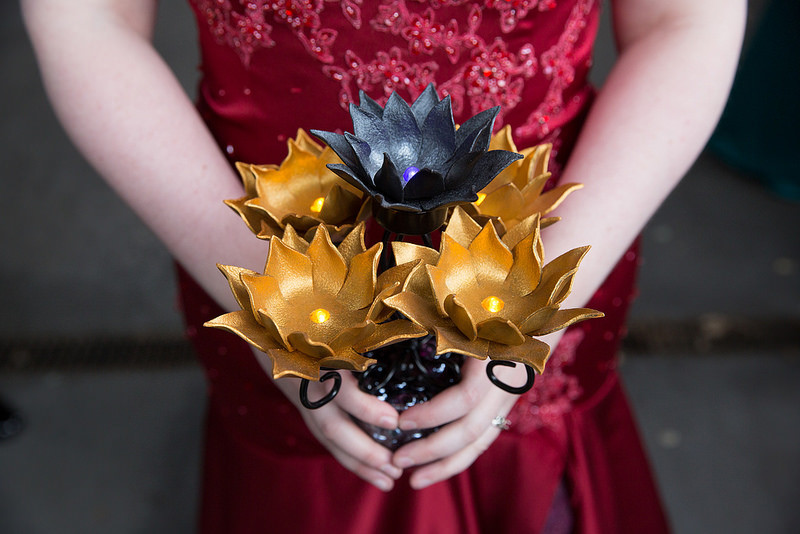


For my wedding, I decided I needed to have the most powerful flower in Magic (updated art here) in my bouquets and decorations, because I am obviously a powerful wizard. But even without the Magical connotations, it’s still super neat looking, so I thought maybe some folks here might be interested in making their own light-up lotus out of leather.
What you will need:
- Leather
- Sharpie
- Round objects to trace (I used painters tape and a chocolate powder tin)
- LEDs (I used Submersible Floralytes)
- X-acto knife
- Water
- Acrylic paint
- Paint brush
- Hot glue gun
How to make them:

In order to make anything out of sculpted/molded leather like this, you’re going to need the right kind of leather. What you’re looking for is the peachy-tan stuff called vegetable-tanned — and I find cowhide works best to hold its shape yet still be workable. I don’t know the actual thickness/weight, but I would say make sure it bends but doesn’t flop.
I’m lucky enough that my dad makes leather shoes for a living (holla to Multnomah Leather Clogs), so when I started learning this I was able to get free scraps. But, a lot of leather stores will have scraps of leather available by the pound, so you don’t have to buy an entire hide when you’re first exploring the medium.

To start, you need two circles (Sharpie works fine for drawing on the leather, since we’re going to paint over it later anyway). It’s possible to use a compass to do this, but since I want a number of identical flowers, it’s going to be easier to just trace around some circular objects with consistent sizes. I chose a tin of hot chocolate mix for my large circle, and a roll of painter’s tape for my smaller one.

These are the LEDs I’m using; they’re called Submersible Floralytes. Mine are purple, but you can get them in several different colors, depending on what you’re going for. Since that bulb in the center is going to be stuck through the center of our flowers, we’ll need to put a hole through the center of our leather circles.

I just eyeballed it (the leather will still be a little flexible after we work it, so I tend to err small on the hole), because it’s hard to accurately trace around that bulb. A standard hole punch would probably be effective, as it’s around that size. (Too bad I don’t have one of those things.)

Then we need to draw in the petals! I do eight petals, because it’s geometrically straightforward. I tend to eyeball this part, but if you’re worried about precision, you can use a ruler and/or protractor. I do it by marking eight dots equally spaced along the outside, for the points of the petals, then drawing eight lines for the dividers between the petals, then sketching in curved lines to finish it out.
Then cut these out. Regular scissors work for the outline, and I used an X-acto knife for the center hole (because of my aforementioned lack of hole punch). It is VERY IMPORTANT not to cut all the way down the line on the petal to the center, because then your lotus will fall apart. It’s much easier to work with as one unit, rather than individual petals. It can help to draw a circle around the base of the LED around the center, to let you know where to stop cutting.

Then, soak these bad boys. Recommended time for soaking varies; this leather is fine after 1-3 hours, and thicker stuff might want to soak overnight. Just make sure it’s completely submersed, and usually it’s done when the water starts looking brown, and no more bubbles float up when you press down on the leather.
It’ll want to float when you first put it in; I find pressing it down for a little bit works to keep it submersed, but you can also weight it with a heavier object.

Once your leather is done soaking, you will probably want to work on a towel when you shape it. This is the fun part! As it dries, you’ll probably want to reassert the shaping from time to time; recurl the petal edges with your fingers, that sort of thing.

Also let it dry in a more open shape, once it’s gotten the hang of the closed-bloom curve at the base of the petals. It takes a long time to fully dry, but you want to get a lot of the shaping done quickly, so it will keep its shape better later.

Then, paint! I find acrylic paint works best; it covers nicely, dries quickly, and will last well and help preserve the leather since it’s plastic-based. I have not found a way to paint these without getting paint on my hands, but luckily acrylic comes off pretty easily and cleanly. These will probably want several coats to get properly covered, and I’ll probably add a little black mixed with silver to give it a bit of a sheen.

Then, hot glue them onto your LED. If the center hole is snug enough, sometimes they’re pretty solid even when not glued down, but it’s best to glue it to be sure.

I’m going to leave mine like this, because instead of a bouquet, I’m going to put these guys in glass bowls with clear marbles; a bit of light comes out the base, so I’m hoping to get a slight glow through there. But it’s totally possible, with a little ingenuity, to add a stem to this (it’d have to be pretty sturdy) or affix a hairclip to it somehow. You’ll want to make sure, with this kind of light, that you can still twist the base to turn on the light, so nothing that completely covers the base.
Regardless of how you use it, these glowing flowers will look awesome anywhere!




12 responses to “How to make your own light-up, leather lotus flowers”
Amanda-
You rock so hard! This really inspires me to do some leatherworking of my own. You probably are well aware of this, but you can also use a large needle and embroidery floss for sewing together pieces of leather.
I’d love to see more of your artwork sometime!
-Mary
Thanks! It’s super easy and fun to work with leather, and I highly recommend it. I’ve got more art up at my DeviantArt page, if you’d like to check it out: http://petrichora.deviantart.com/gallery/
My brother-in-law just showed me this and the groom and I just agreed on the spot to make black lotus boutonnieres. Also, Magic Cards With Googly Eyes is one of my favourite things in life. You are officially the coolest person in the world.
Awesome! I wanna see pics when you do those!
What’s the reason for soaking the leather for hours vs. wetting it with a cloth or sponge? That’s the way that I had learned to do wet-moulded leather, and I’m wondering what the difference is. The guy who I learned from said that you could dunk the leather in the water instead of using the sponge, but that he didn’t like doing it that way because it took longer to dry. And he indicated that you would just dip is for a short period of time (30 seconds or so), not leave it submerged. Does soaking it for that length of time change how the leather is to work with?
(Oh and I forgot to mention – these look awesome!)
Hm, I heard you’re supposed to soak it, but it’s possible that dampening it works just as well. For thicker leather I’m pretty sure you have to soak it to get it to do anything. My dad makes clogs (http://www.multnomahleather.com) and he has to completely soak the uppers before shaping them, so maybe I’m just influenced by that.
That’s possible! Thanks for the info. I’ve only worked with 7-8oz (I think) leather, and it was pretty pliable after just being dampened (though we did have to get it fairly damp to work with it!). The person I learned from said that you *could* get it more wet, but it would just take longer to dry and you’d have to make sure it stayed in position longer. But I’ve never worked with really thick leather, so that could be the difference!
this looks amazing! thank you Amanda the Great!
I am wondering why you painted the sueded side for the interior of the flower instead of the finished side. is it because the paint adheres better?
also, I just found some great multi-surface paint at a chain crafts store, and the label includes leather and glass as acceptable surfaces.
also – LOVE your art! the “Sunset on the River” reminds me of cormorant fishers on the Yangtze River – only cooler with a dragon! the botanical rose is lovely and atmospheric.
Thanks! Basically, one side had to be the sueded side, and I think it’s more important for the outside of the flower to be smooth, for the overall look of it. Your mileage may vary. Acrylic paint adheres pretty well to leather no matter what.
1) you’re my hero for putting black lotuses in your boquet.
2) I see that Boros button in the background. Gotta love the legion.
This is seriously an awesomely geeky DIY bouquet idea. Love it!
I love the idea of using LEDs in your flowers!
Hahahahaha, the googly eyes are awesome, Amanda! I want to go put googly eyes on my Pokemon cards now! And the Yu-Gi-Oh cards… And the Bang! cards…
Bad ass!
I used floating LED lilies since I wanted water in my centerpieces, but this is so awesome looking.
I’m also planning to work with leather shaping in the future, so this is handy to know…thanks!