


Turns out your grandma was onto something!! Pincurls are the OG of vintage hairstyling, an absolute staple for achieving classic waves and structured curls, no fancy tools required. Whether you’re going full-on retro or just want a touch of old-school glam, this technique has been keeping hair fabulous since the 1920s…. and today we’re going to talk you through it step by step.
But wait first: hi! 👋 We’re Roxie Jane and Ariel. One of us is a hairstylist and one of us is a wedding blogger — but we both LOVE the look of timeless curls, braids, and updos so much that we wrote a whole dang book about it! Our Lazy Girl Guide to DIY Vintage Hair Guide is packed with step-by-step tutorials to help you master the art of vintage hairstyling at home.
Below, we’re going to share Chapter 1 from our Lazy Girl Guide to DIY Vintage Hair Guide: how to DIY pincurls! This technique is ideal for anyone with short hair or medium-length hair, but it works on longer hair too. The best part? You don’t need heat, and once you get the hang of it, you can set your curls in minutes.
Let’s dive in…
The Foundation of Fabulous: Your Easy 1940s Pin-Curl Set
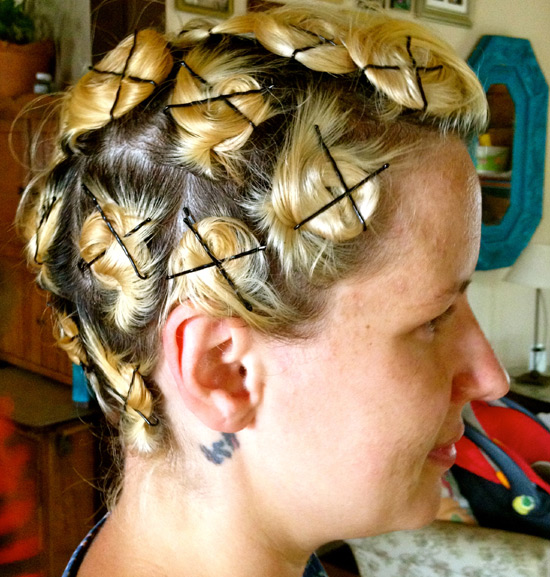
Here is how the pincurls look while they are curling up your ‘do. Note the crisscrossed bobby pins close to the scalp. Photo courtesy of Roxie from How-To Hair Girl
Every masterpiece begins with a solid foundation, and when it comes to vintage hairstyling, nothing is more fundamental than the 1940s pin-curl set. This timeless technique is your gateway to creating styles that range from soft waves to sculpted rolls and intricate updos. Whether you’re perfecting Victory Rolls or prepping for milkmaid braids, pin curls provide the texture, bounce, and structure to make any style shine.
If you already have plenty of curl/wave, you can try these pin-curls out and see if you like the effect- it should add a little polishing to your style. You can also skip this step and jump ahead with your natural texture!
Roxie Jane will walk you through the essentials, breaking it down step by step so that even beginners can achieve this classic base.
What You’ll Need
- Spray Bottle with Water: Damp hair holds pin curls best.
- Bobby Pins (Large and Small): Essential for securing the curls in place.
- Comb for Sectioning: A tail comb works wonders for precision.
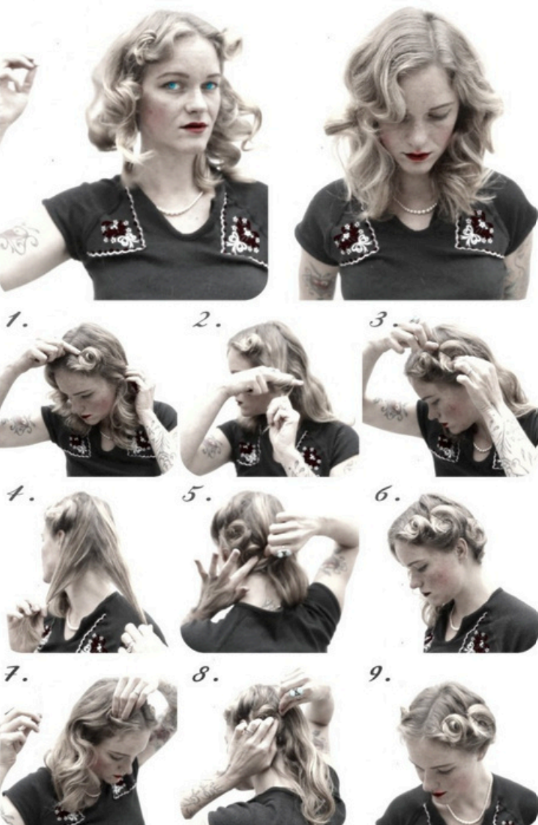
Steps for Your 1940s Pin-Curl Set
- Part and Prep:
Divide your hair into two sections down the middle. If you have bangs, section them off separately. Lightly mist your hair with water until it’s damp, but not dripping. - Roll the Bangs:
- For bangs, twist the hair around your finger, rolling it backward toward your scalp.
- No bangs? Simply take a small front section of hair, twist it into a curl, and pin it flat against your head with a small bobby pin.
- Continue Down the Sides:
- Working vertically, take a section of hair about two inches wide and roll it under toward your scalp. Secure it with a pin.
- Repeat until you have four flat curls on each side of your head.
- Repeat on the Other Side:
- Mirror the pattern on the opposite side of your head. Each curl should align neatly for balance and structure.
- Mirror the pattern on the opposite side of your head. Each curl should align neatly for balance and structure.
- Let It Set:
Pin curls need time to dry completely. If you’re short on time, set them in the morning for soft waves by evening. For crisp curls, leave them overnight, gently wrapped in a silk scarf or bonnet.
Tips for Textured Hair + Curls
For coily or textured hair, pin curls can be a fun way to stretch and shape your hair without heat. Apply a leave-in conditioner or lightweight styling cream before rolling to enhance moisture and manageability. Smaller sections create defined curls, while larger sections produce a looser wave.
Watch Roxie Jane Hunt’s step by step pin curl tutorial to get the look:
If you don’t see the video below, try disabling your ad blocker!
🔓Unlock More DIY
Vintage Hairstyle Tutorials!
🎀 Why You’ll Love This Guide: Vintage Hair, Your Way!
Tired of tutorials that make DIY hairstyling feel like a full-time job? Our Lazy Girl Guide to DIY Vintage Hairstyling is here to change the game. This isn’t about stiff, over-sprayed updos or high-maintenance styling. This is about making gorgeous, vintage-inspired hair feel EASY.
✔ Step-by-step tutorials: so clear, it’s like your hairstylist bestie is whispering instructions in your ear.
✔ No heat, no fuss, no problem: styles that work with your natural texture, not against it.
✔ Inclusive & adaptable: whether you’ve got thick waves, tight coils, or sleek strands, we’ve got you.
✔ Hairstyles that last: because who has time to redo their ‘do every few hours?
✔ Braids, buns, and beyond: learn how to mix, match, and make these styles your own.
This isn’t just a guide. It’s a shortcut to effortlessly cool, beautifully styled hair that makes you feel like a vintage dream without spending hours in front of a mirror.
🔥 Limited-Time Deal: Because Good Hair Shouldn’t Wait! 🔥
For the next 72 hours only, grab your copy for just $9.99 instead of $12.99. That’s 20% off for early adopters who are ready to step up their vintage hair game.
💨 This deal disappears faster than a perfect curl in humidity, so don’t wait!
👉 BUY NOW FOR $9.99 WITH COUPON CODE 4LAZY




22 responses to “Pin curl your hair for major no-heat waves and retro style (pin curls work great on short hair too!)”
I personally cannot sleep in pin curls so I do head-band curls. Slightly different looking curls to pin curls, but still beautiful. I have worn the head-band during the day for nights out and gotten compliments on my hair style, which wasn’t a style…
I love the look of the pincurls, will be attempting this at the weekend. Hayley – Any chance you could explain the method for the headband curls too??
I am like the princess in the Princess and the Pea (and not very Princessy otherwise!) , so it is unlikely I will be able to sleep with the pins in either!
Here is a link to a headband curl tutorial.
Does anyone know if you can pin them when your hair is wet, and use a blow dryer to speed up the process?
I do not recommend pincurling on wet hair, slightly damp with setting lotion (diluted for your hair type is best). When I experimented on wet hair, they seemed to have a funky kink that wouldn’t brush out into soft waves, not to mention I got the headache from hell. This is my daily style so I have practiced quite a lot (my grandma was born in the late 20s and she raised me so I grew up with this as the norm). When you get out of the shower, sqeeze as much water as possible out of your hair, go about the rest of your routine, brush through, and it should be “dry enough.”
You can. Put the pin curls in when your hair is damp, not wet and it will dry much faster:)
I’d also add, depending on your hair type, blow drying to speed things up can cause a lot of frizz. Start with low heat and low speed to minimize this if your hair is prone to fly aways or frizz.
I have super long hair so I am leaning toward doing spiral wrapped rag curls. similar no heat, no stress hair style.
I have a lot of long hair. It does not hold a heated curl for the life of me. So I separate my hair into a few buns. I part them to the sides so I can comfortably sleep on my back. I wet my hair before bed, put it up, then sleep. When I wake up, I get ready, then right before I step out of the car, I take my hair down, run my fingers through, and voila! It looks natural and it’s very low maintenance! 🙂
I have shortish hair (it will be a couple of inches above my shoulder for the wedding), and it hates heat curls of any kind (or really any heat aside from occasional straightening), so this might be a perfect idea.
A tip: put a playing card or piece of slightly rigid paper between the hair and the pin to avoid dents (especially useful on short hair).
Adding a curlformers recommendation into the mix,
A wet set with motions foam + curlformers gives me curls for days ?
Love this piece. Such a fun, non-damaging way to have gorgeous locks!
If you can, try to avoid using bobby pins. Use flat pincurl clips, or, like rumorsofmydemise suggested, use a playing card or bit of stiff paper to avoud dents.
Where has this been all my life. Thank you so much.
i love it honestly and i think that they are cute maybe i will do it someday
I use pin curls frequently! Easy and if I use a good product I have volume and body for DAYS!
What products have worked best for you?
I did my sisters long blond hair for her wedding. it was slightly damp and we did it about 3 the day before the wedding. She never had it in curls before. So I set it in rags– about 15 min. before leaving for church we took them out- and just loosened with fingers—looked so great and lasted all day too.
I’ve heard rumors of this said “rag” curls! How does one actually go about setting their hair in rags to curl?? Are they small, ripped rags?
Do you have a good easy tutorial for this? I’ve never been able to figure out rag curls and I’d love to try them.
We’ve got a rag curls tutorial right here: https://offbeatwed.com/rag-curls/