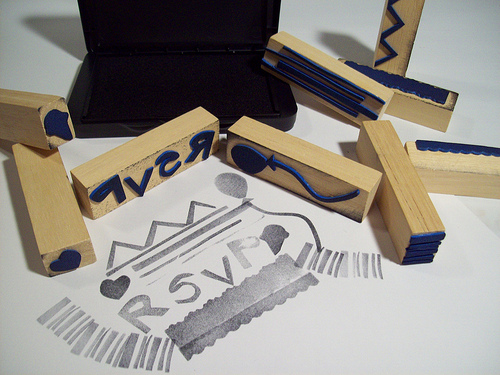


Stamps are a great way to personalize anything from paper napkins to RSVP cards, and small muslin bags for favors to after-party back-of-the-hand style party antics. Whatever your reason for wanting a stamp, you can create a pile of them easily, mixing and matching them to suit your needs. Best of all, do-it-yourself stamps are highly customizable.
Here’s how to make your own.

Materials and Tools
- Tumbling blocks (I used an off-brand Jenga set that came from a Goodwill find.)
- Foamies sheet
- Scissors and/or Fiskars Paper Edgers
- Liquid Stitch fabric glue
- Ink pad
Step 1:
 Cut a strip of the foamies that will fit the width of your tumbling block. You may decide to do stamps on the smallest end, in which case, you should cut a smaller strip of foamies.
NOTE: You can use edger scissors to cut out strips that are ready-made patterns.
Step 2:
 Use Liquid Stitch to glue the foamies to blocks – the fabric glue is a permanent adhesive and works like a charm to hold fabric and fabric-like materials to the wood. Other glues you have on hand should work, too, but don’t expect regular school glue nor wood glue to hold properly, FYI.
NOTE: If you’re spelling out words, remember to reverse them when you’re gluing them down! (See the RSVP stamp.)
Step 3:
Tada! That’s it! Just wait for the glue to dry (liquid stitch takes about 30 minutes) and then you’re ready to stamp away!
Applications:
Handmade invitations and other paper goodies seem like a natural fit for this project. You can also use these stamps to mark your paper napkins, stamp your bamboo picnic cutlery, or on thank-you notes.
You can also use stamps for many other reasons. Rock out with some hand stamps at your after-hours party, for example. You can also use special inks to permanently stamp fabrics, to customize ribbons, to decorate glasses or candles, etc.
Tips:
Make sure any lettering you’re using is reversed when you glue it down, or it won’t read correctly when stamped.
Your first application stamps will need to be pat into the inkpad thoroughly before they gather enough ink to be legible. After that, they’ll act like any other foam stamp.
Niche:
Here are a few ideas to get you started:
- Foodies! Stamp your own party napkins to save a bundle.
- Poly folk! You can make a stamp that hearts you + all of your family members.
- Gamers! Eight bit = made for stampin’ things. Zelda hearts FTW.
- Music-lovers! I’m dying to see a custom rockin’ hand stamp. Dying.
Your Turn!
Fess up — how are you planning on taking this project on and making it your own?









11 responses to “Make your own stamps using tumbling blocks”
Another option for stamps is to carve rubber erasers (bigger and flatter is better, and you don’t want one that’s crumbly). Most crafting stamps are made out of rubber and you can carve it to more detail than you can probably get cutting foam. So if you’re going smaller, maybe look for rubber options. Just use different glue to adhere it to wood or try using it without the wood or even using double sided tape to stick it to an acrylic block.
Good options. As someone who’s terrible at carving, well, anything, even turkey, I like being able to cut things out, so this foam option works for me. There are some great tutorials out there for turning pink erasers into awesome stamps, you’re right. I’d love to see how people use self-made stamps of all kinds 🙂
While we’re talking about rubber options, soft linoleum or “softoleum” isn’t all that expensive if you’re willing to venture into carving. As a printmaking student I used to get frustrated with the costs of some items at art supply stores (especially etching plates and large pieces of linoleum), but small pieces of soft linoleum are easy, easy to carve and usually costs a couple to a few dollars. Useful tools are an exacto-knife to cut around the edge of your design, and a tool you can find at art stores that looks like a sharp metal scoop on the end of a stick.
If you are going to try this route, draw your design out on the linoleum first and carve SLOWLY.
(Little pieces of harder linoleum also work well, you’ll just need a sharper tool and bit more pressure to get through them.)
This is SO COOL! What a great post. I was just looking for stamps, and this is perfect for doing something totally unique. Thanks for posting. 🙂
I’m totally picturing making a big set of muslin napkins for our foodie parties, all stamped with chickens, cows, and goats.
I made napkins for my wedding reception (to get the RIGHT color – don’t ask….!) from fabric I bought online at a really great site. I just WISH I had known about stamping them, that would have been such a great personal touch – sigh…
Dollar General has the block game for $5.
They also have a dollar section with tons of foam option. I bought the large foam shapes and door hangers and cut my pieces out of them. Worked perfectly!
Awesome! And good call on dollar store finds!
Thank you so much for this. I’ve always wanted to make my own stamp but I don’t have the talent to carve.
This is a perfect craft, i was wanting to get more stamps but dont want to buy alot so this will save me money and i can just make my own! great idea!!!!
I’m thinking custom hand stamps for my 21st birthday party!