


Holy gorgeous swirly retro curls, Batman! Tami Lee of My Moving Finger Writes knows how to rock out some retro waves that we know some era-inspired brides will totally be up for trying.
But before we dig in… HI! 👋 We’re Roxie Jane and Ariel. One of us is a hairstylist and one of us is a wedding blogger — but we both LOVE the look of timeless curls, braids, and updos so much that we wrote a whole dang book about it! Our Lazy Girl Guide to DIY Vintage Hair Guide is packed with step-by-step tutorials to help you master the art of vintage hairstyling at home.
How to do retro finger waves on your bangs with pin curls
Tami creates barrel pin curls first, then uses long metal clips to smooth the bang curls into waves. Roll the curls on the larger half of your hair part away from the hair part. Roll the curls on the smaller side towards it:
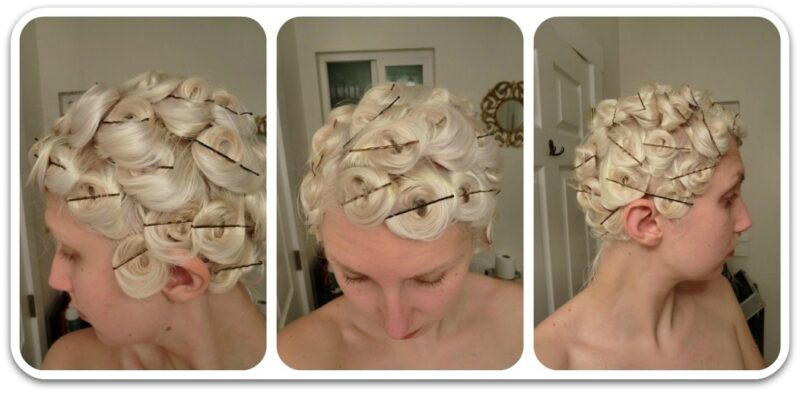
So, the art of turning pin curls into great waves takes practice.
But here’s a small tutorial that explains the basics. If you have any questions feel free to ask. 🙂
To start we’re going to use barrel curls.
They are pretty similar to flat pin curl but instead they are more 3D.

Roll the curls on the larger side of your hair part away from the hair part.
Roll the curls on the smaller side towards it.

The pin curls on the back of your head should just be normal flat pin curls.
If you’re wondering why, it’s so you don’t smoosh them in your sleep. If you sleep on the side of your head you might want to make the lowest row on the sides flat as well.
Wrap a bandanna around your forehead so none of the barrel curls get smooshed down. Your bangs are going to be pretty curly, so brush them out and sculpt them down into waves.
Use long metal clips to secure them as you go along. Spray and leave them in while you do your make-up/eat breakfast/flash your neighbors etc.

Want to try a different retro finger waves look?
Here’s Tami Lee’s Pin Curled Finger Waves 101


Tools used: Clinique mascara tube, spray bottle of water

Next morning. I take the pins out and just let the curls chill while I put my face on.

Now just brush everything out. I didn’t brush my hair before setting it, so this part was torture. Don’t follow my lead.

You’ll already be able so see some distinct waves.


Now go back and rebrush everything but from underneath, like so:
(FYI, I do know what the handle on a brush is for)

Do this in layers, and start from the bottom.

So, now you have a beautiful wave! If you like the natural, soft look you can stop here. I am over-the-top, so I go on to make this wave even ‘better’.

I use my handy dandy alligator clips (without these things I don’t think I could do a single hairstyle)and push the wave together, making it more extreme. Do this all around, hairspray and let sit for a while.


Voila!


And here’s one with a smile, just to prove I’m not as deadpan as this tutorial makes it appear.
🔓Unlock More DIY
Vintage Hairstyle Tutorials!
🎀 Why You’ll Love This Guide: Vintage Hair, Your Way!
Tired of tutorials that make DIY hairstyling feel like a full-time job? Our Lazy Girl Guide to DIY Vintage Hairstyling is here to change the game. This isn’t about stiff, over-sprayed updos or high-maintenance styling. This is about making gorgeous, vintage-inspired hair feel EASY.
✔ Step-by-step tutorials: so clear, it’s like your hairstylist bestie is whispering instructions in your ear.
✔ No heat, no fuss, no problem: styles that work with your natural texture, not against it.
✔ Inclusive & adaptable: whether you’ve got thick waves, tight coils, or sleek strands, we’ve got you.
✔ Hairstyles that last: because who has time to redo their ‘do every few hours?
✔ Braids, buns, and beyond: learn how to mix, match, and make these styles your own.
This isn’t just a guide. It’s a shortcut to effortlessly cool, beautifully styled hair that makes you feel like a vintage dream without spending hours in front of a mirror.
🔥 Limited-Time Deal: Because Good Hair Shouldn’t Wait! 🔥
For the next 72 hours only, grab your copy for just $9.99 instead of $12.99. That’s 20% off for early adopters who are ready to step up their vintage hair game.
💨 This deal disappears faster than a perfect curl in humidity, so don’t wait!
👉 BUY NOW FOR $9.99 WITH COUPON CODE 4LAZY





11 responses to “Create some retro fingerwaves with barrel pin curls”
This is the way my grandmother taught me how to do finger waves. She was actually part of the 40s generation and had long hair, but holy hell did she look gorgeous!
Yes, I’m from back in the 40’s as well and pin curls were all that we did besides those who wanted the 20’s waves with clips. For long hair we had teh Goody metal curlers that I wish they still had as they are really teh ONLY thing that WILL CURL long air. You can get ringlets with those too – they came in many sizes and were the greatest curlers ever. Wish we could still get them. They have lousy flimsy curlers today that do not work.. Miss those old days !
We had to learn these in cosmetology in grade 10 on those scary doll heads but it’s escaping my brain now how to do it – thanks for the refresher! Back in the 90’s I wasn’t exactly psyched about finger waves but now they are very much back in style 🙂
Very easy Stacy – just wrap a piece of hair around your lower finger that is touching your head as the base of the curl. Slip curl off the finger onto the head and hold in place until you put two bobby pins criss crossed onto it to hold it in place. Very easy. Wet the hair before wrapping around the finger so the curl will last longer when brushed out..
IF you wet the hair a bit the curl will hold a lot longer once brushed out. Other wise the curl will be limp in no time – so wet the hair a little bit before you set your pin curl.
Here’s a secret not many know =
If you want natural waves – always brush your hair towards the back and let the waves fall into place naturally. Gives you a great full look so you don’t have a flat hair style.!
===
THIS IS SO HELPFUL!!!!! Esp. to a hairstyle challenged girl like myself.
I think that’s somewhat similar to how my hair stylist did my wedding ‘do. That and a metric shit-ton of bobby pins and gunking it up overnight with mousse so my fine hair would hold. You can see the finished product here: http://maryandopie.blogspot.com/2009/10/getting-ready.html
Note that her hair is medium/fine bodied and blonde – my hair is super thick, shoulder length, and has a heavy silky texture which actually makes it hard to work with in these styles. BUT that can be overcome with the following techniques/products (and a good layered cut; this is almost impossible to do without at least some layers in your cut):
So, for THICK ASS HAIR:
1. Work with dirty hair. 2 day unwashed hair will do if you are normally a daily washer. I wash every 5-7 days (yes really, and your scalp does indeed produce less oil after a while) so for me, day 4 hair is perfect.
2. Lottabody setting lotion (old school! found in ethnic hair stores or beauty supply stores; dilute before use!) or Motions foam hair wrap has also gotten good reviews
3. Creating an exaggerated set – i.e. if you want a curl to wave back away from your forehead, create the standing pincurl so that it faces back towards your crown (set it with the setting spray). The bonds in the hair will then be “anchored” in that direction so even when you brush it out (gently) they will wave back the way you want, instead of flopping forward on your forehead as soon as you start brushing.
4. Brush gently! Every bit of brushing/combing starts to undo the work done by the set. If your curls are poodle-ey, this is good, but if you have thick hair your curls will be looser to start with, and will quickly droop into beachy waves if you brush too much/too hard (also a cute look but not what we’re going for here). If you can do most of the work with just your fingers and then a light brush to smooth, that is the ideal.
^Great advice. I have thick-ass shoulder length hair and have always wanted styles like this but they are hard to get to hold.
Also I wash my hair only once a week or so as well and people think I’m crazy! I’m like “Does it ever look dirty? no? Well there you go!”
Use Wave clamps instead of the Bobbie pins. Harder to find, but the metal heat up when you jump yourself under the hood dryer to set the style. Yeah, I graduated Cosmetology school in 1993 top of my class and a month early. I hates the heavy sculpting gel we used, but it worked to hold all day for thick course hair. 21 yrs in the business was enough for me, but I can say I knew these basic wet sculpts were going to come back! Finger waves and all of the pin curls! Many hours of them!!
I still don’t really get how you go from the curls to the waves. I don’t think this tutorial explained that well enough.
I FULLY agree. Basically it just says next is this and shows a picture without actually explaining how to get to that. Little extra explanation please!!!