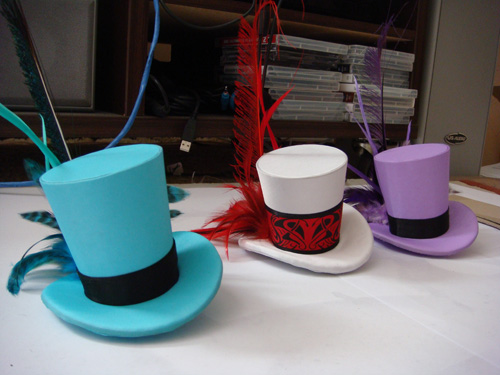
I thought I'd just document how I made these little hats, then with the benefit of my experience you can venture forth and give it a go yourself, knowing I had no idea what I was doing but still managed to do it good enough regardless!
Things I used:
- Construction Paper (though any paper will do, this is just thicker so a bit easier)
- Compass
- Pencil/pen
- Tape
- Patience
- Spray Adhesive
- Fabric for hats (I used satin for the white one, and an acetate lining for the coloured ones)
- Scalpel / Utility Knife / whatever you want to call it
- Scissors
- Hot Glue and Hot Glue gun
- Box board/strawboard/thick cardboard, whatever you want to call it. As long as its a thicker board that is still (just) bendable and will keep its shape. I used a mixture of 1.2mm and 2.4mm thick card.
- Feathers
- Patience
- Alligator Clips
- Iron
- White Felt (though you could probably use some interfacing or something in lieu of this)
- Patience
- Ribbon
- Silkscreen kit– This obviously isn't compulsory, its just how I did the patterning on the ribbon of the white hat.
The groundwork:
First up, I made a basic pattern out of paper and tape to work from.
To do this, I started with the base of the hat. Using a compass, a pencil and some paper, I drew a large circle which would be the size of the brim that I wanted, and then an inner circle using the same center point to define the size of the crown or barrel of the rest of the hat. Then I cut it out, and made sure it was the right size by sticking it on my head and looking in a mirror!
Then to get the pattern for the shape of the crown/barrel that I wanted (which was slightly tapered), I wrapped up a bit of paper into a cone shape with the right tapering angle, taped it together, then put it through the center of the brim piece I had just cut out till there were no spaces between the hole in the brim and the cone (kinda like an upside down witches hat I guess… though there should be quite a bit above because that's the hat part!!). Tracing along the part where the two bits of paper meet will now define the right size for base of the crown of the hat. Then I cut along this line, so that it would stand upright on the work surface. While it is standing, using a ruler, a steady hand and a sharpie, I kept the sharpie against the ruler at the right hat, and rotated the crown to mark out the top at the same height all the way around. Obviously you can use whatever method you want to do this, just make sure that the height is the same all the way around, or the pattern won't be accurate!
 How to make a glittery candy corn mini top hat
Sarah made her daughter a glittery mini top hat, inspired by the most controversial of Halloween candies: candy corn! (Some HATE it, some LOVE it.)... Read more
Then cutting along the line just drawn, it will leave the shape of the crown/barrel of the hat! Then simply trace the circle for the top part of the hat. So you should have three pieces: the brim, the crown and the top.
Making the hat:
Using the pattern/template made from paper, trace out the pattern on card. I used the 2.4mm thick card for the brim and the hat, and the 1.2mm card for the crown. Cut out the pieces and place on a clean and disposable (ie covered with newspaper or something) work area. *note: before tracing out your pattern, make sure you're tracing the crown part of the pattern in the right direction… some cards have a “grain” and its impossible to bend the card against the grain without ugly bends and creases
Iron the fabric to make sure there are no unwanted creases. Then spray both the cardboard and the fabric (sparingly on the fabric so that it doesn't soak through and leave marks) with the spray adhesive. Wait till the glue is a bit tacky, and then carefully place the fabric over the pieces. Be careful there's no hair or creases or anything, as it will show through. At this stage, it should look a bit like this:

However, if you want the brim curvy like the hats pictured, don't glue the fabric to the brim at this stage, just the top and the crown. To curve the brim, soak it in water, then use a large round can or bottle to shape the card. The insides of the card will crease, but thats okay. When its dry, cover it with felt or interface (I used felt because that was on hand), and THEN glue the fabric on top.
Here's what it looked like before I glued the fabric on (but after I glued the felt on):

Wait for the glue to fully dry before moving on. I generally put some heavy books on top and left it overnight to dry. Spray adhesive is generally pressure sensitive, so the more weight you put on it while it dries, the better it adheres.
When its dry, cut around the shapes.

Then using the spray adhesive again, on the backside spray the edges of the fabric and the cardboard. For the top circle piece, fold all the edges over when the glue has become tacky. Try to stretch the fabric as much as possible so you don't see any folds around the edges.
For the crown piece (pictured above) just fold over the fabric on sides and the top. Leave the bottom side (the smaller side) alone for now, it will be easier to fold over when the crown has been shaped. Make sure the corner pieces are stuck down very well!
On the underside of the brim, use a sharp scalpel/knife to score and remove the fabric “folds” that have been created from folding the fabric over to the underside as well as the inner circle. Do this to eliminate all the bumps, as when it comes to covering this up every single bump and lump will show. The underside of the top circle will be hidden in the crown, so it is not necessary to clean the top circle unless you wanted to be neat.
Now comes the tricky bit — the assembly:
Then its just a matter of gluing the completed crown to the brim, and then covering the bottom of the brim. You may want to use some interface or felt again to cover the bumps if you want to make it look professional. I didn't, as while the hat is on you shouldn't be able to see the bottom too much.
To cover the bottom of the brim, use the spray adhesive to glue together two bits of (the same) ironed fabric, and then glue it onto the brim when its dry. This way when you cut out the circle of the brim (I cut it out after I glued it on to make sure I got the right shape, not before), the fabric is much much much less likely to fray. I've been rubbing it a bit to test and there still isn't any fraying, so it will last for as long as I need it to anyway.
Now you are ready for decorating:
A ribbon to cover the join between the brim and the crown would be my first suggestion, then something big and puffy to cover the join of the crown at the back (that way even if you made a mistake no one will even notice!).
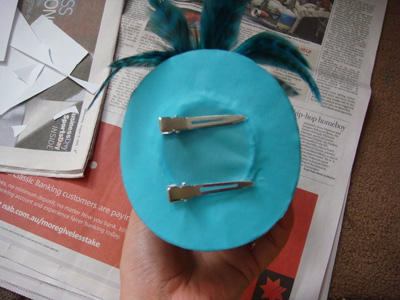
Once you're done with making it look pretty, turn it over and glue the alligator clips onto the bottom of the hat. I guess you could do this before you began decorating too. Whatever works for you.

And that's the end of my long and confusing guide to making a mini top hat. I hope it gave you enough information to figure it out for yourself.

Does this mini-top hat DIY just seem like too much trouble?
We get it. Here are a few of our favorite mini-top hats you can buy on Etsy.


I can’t WAIT to try these! They are so cute!!!
Thank you so so much for posting this! I used the cardboard from a cereal box for the crown and it worked perfectly. Squee!!!
I, too, am having an Alice-inspired wedding, so this tutorial will definitely come in handy. I was thinking of doing a tiny top hat with some tulle in lieu of a veil and had no idea how to go about it until this came along. Thank you for posting this!
Yet another DIY post that won’t quite work for my wedding purposes, but I am dying to make for shits & giggles! I’ll put it on the to-do list for AFTER all my non-floral floral arrangements are done! 😉
I love, love, love these – they’re beautiful!
Also, great well written tutorial.
I’m having an victorian alice in wonderland themed wedding and my friend and I have been looking at soooo many mini top hat ideas and this is by far the best! SOOO excited to show this to her!
I would LOVE to see photos from your wedding! My daughter is doing her home in Alice in Wonderland, so we’re always looking for ideas.
Another easy way to form a portion of the hat is with a styrofoam cup… you cut the bottom and the top off and turn the cup upside down! Makes a perfect Alice hat shape. Then you can continue with the cardboard brim, trimmings, etc. It may save you quite a lot of time!
Wow. That’s fantastic! they look so professional, yet your instructions make them look simple to make. I think I may just have to get crafting…
Ohhh this could work perfectly with our New Orleans theme!
I just tried this today but used a stiff felt since I had it on hand. I turned out beautifully!! The is very well explained and a fantastic tutorial. Thank you!!
I made a tutorial for an asymmetric tophat fascinator. I took some tips from yours. Thanks!
http://www.hungrypanda.net/blog/2011/01/asymmetric-mini-tophat-fascinator-tutorial/
I’m thanking you and my lucky stars for finding this! I’m making top hats for the little girls in dance class and these instructions are great!!!
How do you cover the seem on the back of the tube? I just dont get how you got them to look so seemless…. this project is proving to be harder than it looks….
What a great idea (especially for an Alice in Wonderland themed wedding).
I love how you explained each step so perfectly and put patience in there just a couple of times 😉
my daughter is often asked to model victorian clothing, and I’m crazy about mini top hats but not the prices! I want to make my own, but I’m terrible at patterns. Do you by any chance have the pattern you used you can share?
There is a pattern with this tutorial that you can try
http://www.hungrypanda.net/blog/2011/01/asymmetric-mini-tophat-fascinator-tutorial/
Can you make a video for this please?
Hey, I found this website, and I wanted to say thank you for this tutorial. I’m not really using this for a wedding so much as my own personal fashion, this helped so much!
I love you for this.
xoxo
Love. Love. Love. Love. Love. =]
OMG- epiphany! I was using this tutorial today and having a heck of a time trying to shape the dang barrel of the hat. Then, my fiance walked in, holding an empty Ben and Jerry’s pint of ice cream. Viola! The Ben and Jerry’s container is the PERFECT size/shape to make a hat pattern out of. Happy face. Plus, now we have an excuse to get more ice cream… 😀
Bees, I would seriously pay you for the pattern to make these. I am super crafty but not geometry-inclined… I would LOOOOVE to buy the PDF pattern from you that I could cut out and use to make my own hats for my girls’ Ringmaster costumes for Halloween. Pinkie promise I won’t resell your pattern. Let me know if you can do it!
Hello, just following up on this comment asking for a PDF of your pattern. The proportions on the hats look perfect and would be ideal for my alice in wonderland themed baby girl’s Bday party. Would you kindly provide me with some kind of dimensions or printable pattern…please pretty please?! I’m also willing to pay for it.
I just have one question. I’m trying to figure out how you did the actual height of the height but i’m getting slightly confused. You made a cone and then inserted through the brim piece. Did you insert it with the point going down or the point going up?
Found your lovely tutorial off the web. I’m not getting married, but these instructions would be great for a Steampunk top hat I’m working on. Thanks!
I love this tutorial. Using it to work on a personal project. 😀
Thanks, my daughter is in a school fashion show and this accessory is going to pop! This is so cute and fun! Thanks for the help!
Using your pattern, a couple of these will fit in perfectly on one of the Christmas trees in our house. (hat tree, get it?) I’ve got one in white, soon to be adorned in feathers and ribbons. Can’t wait to use the grey vinyl lizard ‘skin’ material with this! Nice photos to go with clear instructions. Nice job. 🙂
Omg, I think you’re one of my new favorite people! I could make the hat, I’ve made em before but I could never ever ever figure out how to attach the clips…you showed me how! Thank you sso much! Plus your tutorial made my hat making days easier too. Great tutorial too.
I love tiny hats
I am not getting married any time soon, but this is certainly the best tutorial I could find to make a mini top hat for my prom outfit :] Thank you very much.
This is just what I’ve been looking for!! Thanks so much
My daughter is the maid of honor for a steampunk wedding in October. She’s asked me to help her make one of your adorable, stunning, fantastic ( I could go on…) hats. I’m having just one problem and that is the actual size of the
Def must try this!!!! Steampunky and adorkable!
God bless you for doing this! The dress I bought is reminiscent of steampunk and this is perfection!
You rock!!!these are the best ones I’ve seen!Thanks for sharing!!
Really good explaining(: Can’t wait to try this out!
I tried this out and it came out REALLY GOOD! Thank you so much for sharing!
These tiny hats also work well when attached to plain headbands.
Im going to do this now. : )x
I would love to see this in video form, it is much easier to follow. Would you have time to create a video of how you made these? 😀
where do I get the pattern to make the hates at??? please tell me so I can try and make some….
I was just inspecting some of these at a pop up Halloween store and this is pretty much how leg avenue assembles theirs. They used flexible plastic instead of cardboard. You know the kind. They make shirt boxes and even the little hat boxes they sell the hats in out of the same stuff! If you are using a good water resistant glue I think using the plastic would be more durable if caught in the rain. I’m a sideshow performer so yeah, I’m making some of these for myself and one of my fellow sideshow performing dolls, the infamous Maybelle!
These are fantastic! I want to make them for a Mad Hatter’s party. My question, how do you get the crown to fit flush with the brim when the brim is curved?
Horrible “tutorial.” The entire construction section has extremely poor instructions and not a single photo to help explain. Final Grade D.
I wish I had seen this sooner. But here at Christmas I am making a lot of them. I made some out of felt. They turned out good but I am going to do the big ones your way. Here is something I did also if u need very kitty one . My daughter drinks lots of k . Coffee and the little coffee cups make perfect little snowman hats. Just a thought.thanks so much.